7 Easy Ways to Remove Background from Image in Photoshop

In the area of photo editing, you might hear the term– background removing from an image. It’s been a very useful and popular way, especially in the eCommerce industry. What it does actually- it erases the inappropriate background from a photo to make it more perfect. In this case, Photoshop offers the editors to remove the background in multiple methods.
Well! We will try to keep all the possible tactics in our guide so that you can choose the most suitable one.
Table of Contents
How To Remove Background from Image in Photoshop
- Remove Background Using Photoshop’s AI Feature
- Remove Background with Background Eraser Tool
- Remove background from Image with Pen Tool
- Remove Background with Magic Wand Tool
- Remove Background with Magnetic Lasso Tool
- Remove Background with Color Range
- Remove Background with Refine Edge
Overview of Photoshop
Who doesn’t hear the name of the most powerful photo editing software- Photoshop? It’s been the first and must choice of millions of designers around the world. Basically, to manipulate, composite, and convert images to different formats, Photoshop is the ultimate solution. Whether you’ll need to make the color correction or remove the background of an image from a product or subject, it will give you an easy way to do so.
How To Remove Background from Image in Photoshop
Now, let’s dive into the methods for removing the background from an image efficiently.
1. Remove Background Using Photoshop’s AI Feature
Step-1
Open the image and click on “Properties” from the right-side panel. If you don’t see the properties panel, go to Windows > Properties to show the option.

Step-2
Finally, scroll down to the “Quick Action” section and select “Remove Background” to automatically delete the background, and you’re done.

2. Remove Background with Background Eraser Tool
Step-1
First, select an image from which you want to remove the background. Then unlock the background layer.

Step-2
Create a new layer and pull down it after layer 0.

Step-3
Select the Fill option from the Menu.

Step-4
Now, from the Fill button, you have to select Foreground Color keeping the opacity 100%.

Step-5
From the Toolbar, choose the Background Eraser Tool to start the background removing task.

Step-6
In this phase, make the necessary changes from the options given in red boxes. Make it zoom and change the ‘Tolerance’ percentage according to your requirement, and keep marked the ‘Product Foreground Color’ option.

Step-7
Select Layer 0 and start marking the background that you want to remove from the image using eraser tool.

Step-8
Here, you’ll need to implement the ‘History Brush Tool’ to make the final touch-up to the portions where the green area (that are marked to remove the unwanted objects) doesn’t need to be covered.

Step-9
So finally, making the background transparent is done. Here is the final image after completing the whole process.

You may also like our another blog-
How to Make Image Background Transparent in Adobe Photoshop?
3. Remove Background from Image with Pen Tool
Step-1
At first, insert the image to Photoshop and select the ‘Pen Tool’ from the Tool Bar.

Step-2
Start with the basic pen settings and choose ‘Path’ from the red box shown in the picture.

Step-3
Just right after that, keep marked the ‘Combine Shapes’ before starting the creat path.

Step-4
Now, start creating a path with the pen tool. Remove the handle by clicking the ALT button from your keyboard.

Step-5
Now, from the Layer Menu, choose the ‘Current Path’ option from ‘Vector Mask’.

Step-6
Select the ‘Combine Shapes’ as marked in the red box in the picture and keep drawing the new path.

Step-7
Now, choose the ‘Subtract Front Shape’ to erase the selected portions.

Step-8
Keep drawing the path to remove the unwanted portions from the image to finalize it.

Step-9
Here is the final version after removing the background from the image.


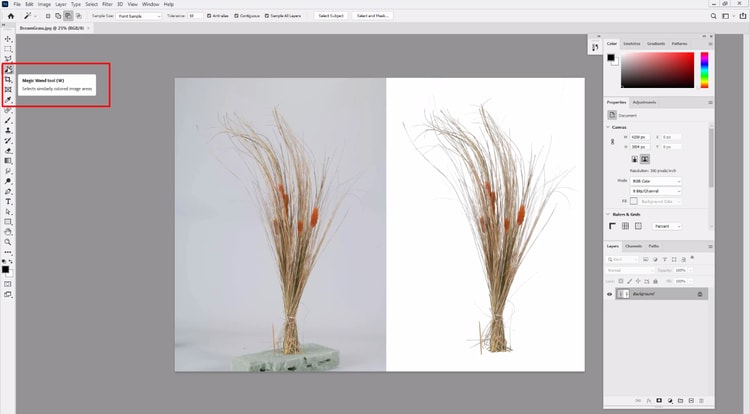
4. Remove Background with Magic Wand Tool
Step-1
Open the image and click on the Magic Wand Tool from the left Toolbar
Step-2
In this part, you have to make some changes in the settings to make the work done properly. In the left red marked box indicates the ‘single selection’ to be marked while you are using the Magic Wand Tool for the first time. And the other options in another red boxed should be marked.

Step-3
Now, select the background that you want to erase from the image.

Step-4
To start the procedure, don’t forget to unlock the layer from the marked portion.

Step-5
In this phase, change the Magic Wand Tolerance value to 30 and unmark the Contiguous option.

Step-6
Now, unlock the layer and press DEL to remove the background from the image.

Step-7
Create a new layer and pull it down below Layer 0. Then fill with the Foreground color.

Step-8
Again, select the Magic Wand Tool from the Toolbar.

Step-9
To modify the selection, use Subtraction from the Selection.

Step-10
After dealing with Subtraction, press DEL to finish the process of removing the background and finally save it.


5. Remove Background with Magnetic Lasso Tool
Step-1
To start working with Photoshop Lasso Tool, it’s important to set up the Lasso tool according to the requirements. You may also use shortcuts to make the process smoother.

Step-2
Now, drag the Lasso anchor around the object.

Step-3
To convert the Lasoo anchor into Marque selection, double-click the mouse pointer after making the selection.

Step-4
Now, click the Layer mask to remove the background. That’s all!


6. Remove Background with Color Range
Step-1
First, Pick an image and select the color range from the Select Menu.

Step-2
Choose Black Matte in Selection Preview and Add to Sample icon.
![]()
Step-3
With the Add to Sample option, remove the white portions from the image. Also, adjust the Fuzziness.

Step-4
Now, select White Matte and Subtract Sample option to remove the object color.

Step-5
Now, add a layer mask to remove the background from the image.

Step-6
Select the Brush tool and Layer mask, and keep the Foreground color white.

Step-7
Now, paint with the Brush tool to recover the object color.

Step-8
Remove remaining background selecting the foreground color Black.

Step-9
To improve the body color of the subject, use shadow and highlight according to requirements.

Step-10
Also, you may use selective color to highlight the subject’s white area.

Step-11
Finalize it removing the rest of the unwanted spots from the image and saving it.


7. Remove Background with Refine Edge
Step-1
Open an image and click on a selection tool from Toolbar.

Step-2
Click the Select and Mask option from the option bar right below the menu.

Step-3
Select the object selection tool and drag the object area.

Step-4
Here is the overview after dragging is done.

Step-5
Now, select the Refine Edge Brush tool to remove the selected portion of the background.

Step-6
To remove the rest of the unwanted portions, use the Lasso tool.

Step-7
Shift+Click on Layer Mask to compare the changes.

Step-8
To get back the removed object that shouldn’t be erased, press Shift using the Lasso tool.

Step-9
Now, remove the unwanted Layer and save it finally.


So, you got multiple options mentioned above on how to remove background from image in Photoshop. Mostly, the techniques are helpful for beginners. Also, some of them are perfect for advanced users. Pick the best tactic that suits your choice.
You May Also Like Blog Posts
How to Use Refine Edge Tool in Photoshop
How to Make Image Background Transparent in Adobe Photoshop?
Remove Image Background using GIMP