Ghost Mannequin Photography: The Complete Guide for Fashion Brands
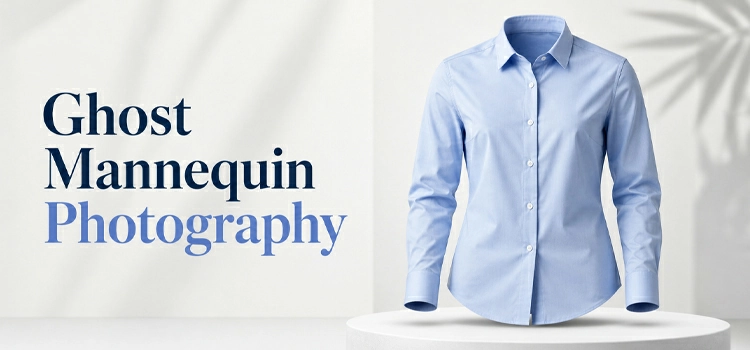
Ghost mannequin photography is a product-imaging technique where a garment is shot on a mannequin, which is then digitally removed in post-production. The result shows the clothing in a lifelike 3D shape with a hollow, invisible interior, ideal for e-commerce catalogs.
You have seen these photos a hundred times. A shirt floats on a white background. No model. No visible mannequin. Just the garment, shaped like someone is wearing it. That is the ghost mannequin photography.
Photographers shoot the item on a mannequin first. Then image editors remove the mannequin in post-production using photo editing tools like Photoshop. What is left looks like the clothing has its own invisible body inside it. This trick works on shirts, jackets, dresses, pretty much anything you can wear.
Why Do Brands Bother With This Technique?
Brands use ghost mannequin photography because it sells more clothes. It shows the garments true shape without a distracting model, and applies one clean, consistent look across the catalog. That consistency builds buyer trust, which lifts conversions and reduces returns.
Think about your own shopping habits. When you browse online, you want to see the actual product. Not a model’s face or not their pose. Just the garment, clear and true to shape.
Ghost mannequin shots give every product the same clean look. That consistency builds trust. And trust means fewer returns, more sales, and a catalog that looks like it belongs to a real brand.
How Does the Whole Process Actually Work?
The garment is dressed on a mannequin and photographed from multiple angles, including a separate inside-collar shot. Editors then remove the mannequin, merge the inside-neck shot, smooth the edges, and adjust shadows so the clothing appears fully shaped and floating.
First, a mannequin gets dressed in the garment. Photographers shoot it from multiple angles-front, back, sides. Then comes a tricky part: shooting the inside of the collar or neckline separately. This shot gets blended in later.
Next, photo editors strip out the mannequin completely. They merge the inside-neck shot into the main image. The edges get smoothed. Shadows get adjusted.
End result? A garment looks like it is floating, fully shaped, with zero sign of editing.
What Gear Do You Actually Need?
Ghost mannequin photography needs a high-resolution camera, an invisible or hollow mannequin, proper lighting equipment, a sturdy tripod, a clean white backdrop, and editing software like Adobe Photoshop. The hollow mannequin matters most, since it cuts editing time significantly.
Start with a solid camera. High resolution matters here, customers zoom in. Next, grab an invisible or hollow mannequin. These cut your editing time way down because there is less to remove.
You will also want:
- Proper lighting equipment
- A sturdy tripod
- A clean backdrop (white works best)
- Editing software like Photoshop
Skip any of these, and your photos will show it, you will not get desired result.
What is the Best Lighting Setup?
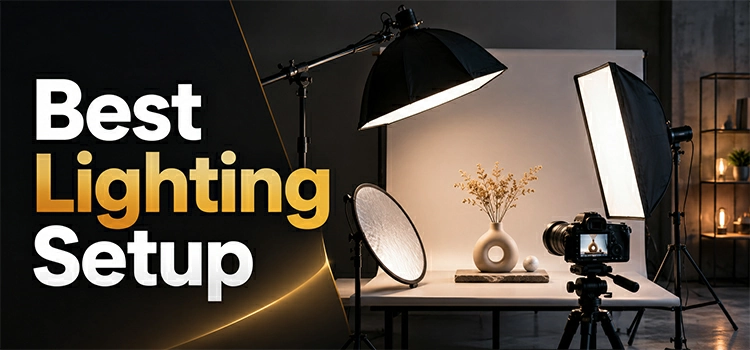
The best setup is three-point lighting: a key light, a fill light, and a back light working together, with softboxes to diffuse harsh shadows. This reveals true fabric texture and color, which customers rely on entirely when judging a product online.
Most photographers go with three-point lighting. That means a key light, a fill light, and a back light working together. Softboxes help diffuse harsh shadows so the fabric looks natural.
Why does this matter so much? Because customers judge texture and color through your photos alone. Bad lighting hides details. Good lighting shows the customers exactly what they are buying.
Does Every Garment Need the Same Approach?
No. Different garments need different angles. Shirts need front, back, and inside-collar shots; dresses need extra angles for silhouette; jackets need open and closed versions; trousers need waistband and inside details. Planning each garments shot list ahead keeps the shoot efficient.
Shirts need front, back, and inside-collar shots. Dresses need extra angles to capture the silhouette properly. Jackets need both open and closed versions. Pants need waistband and inside details covered too.
Skip the planning stage, and you’ll miss shots you need later. Plan ahead, and the shoot runs smoother.
What Happens in Post-Production?
In post-production, editors remove the mannequin, then drop in the separate inside-neck shot to create the hollow look. Edges are blended so nothing appears cut or pasted, shadows are added back for depth, and color correction matches the fabric’s real-world shade.
Editors remove the mannequin first. Then they drop in that separate inside-neck shot to create the “hollow” look. Edges get blended so nothing looks cut or pasted. Shadows get added back in to create depth because a totally flat garment looks fake.
Color correction wraps things up. The fabric needs to match its real-world shade exactly. Customers notice when colors look off.
What Mistakes Should You Watch Out For?
The most common mistakes are harsh, uneven lighting, skipping the inside-neck shot, inconsistent angles across products, low-resolution images, and rushed editing that leaves visible mannequin edges. Each one erodes credibility, so catching them early protects both quality and customer trust.
Common slip-ups include:
- Harsh, uneven lighting
- Skipping the inside-neck shot (creates a flat, fake look)
- Inconsistent angles across products
- Low-resolution images that lose customer trust
- Rushed editing with visible mannequin edges
Each of these costs you credibility. Fix them early, and you’ll save yourself headaches later.
Should You Handle Editing In-House or Outsource It?
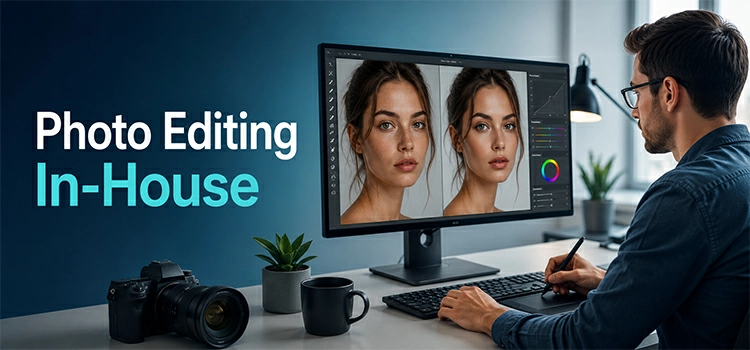
It depends on volume and budget. Outsourcing suits high-volume brands, since professional services bring trained editors, faster turnaround, and easy consistency. Smaller brands can edit in-house to save money if someone knows Photoshop. There is no single right answer.
Outsourcing makes sense for brands with high volume. Professional editing services bring trained staff and faster turnaround. They have done this thousands of times, so consistency comes easy.
Smaller brands might keep editing in-house to save money. That works fine too, especially if someone on your team knows their way around Photoshop.
There is no universal right answer. It is about what fits your workflow.
How Much Should You Expect to Pay?
Costs vary by complexity. Professional studio photography runs roughly $25 to $75 per garment, while outsourced editing alone is about $5 to $25 per image. Structured items cost more than simple ones, and bulk orders usually earn discounted per-item rates.
Photography pricing depends on studio time and equipment used. Editing costs depend on how complex the garment is. A basic t-shirt costs less to edit than a structured jacket with zippers and multiple layers.
Bulk orders usually come with better rates per item. So if you are shooting an entire collection, ask about volume discounts before committing to a provider.
Does Ghost Mannequin Actually Boost Sales?
Yes. Clear, true-to-shape photos reduce guesswork, so customers see the real fit before buying and fewer returns follow. Clean, professional visuals also signal a legitimate, established brand, and that perception alone measurably lifts conversion rates across an e-commerce catalog.
Clear photos reduce guesswork. Customers see the actual fit and shape before buying, which means fewer surprises when the package arrives. Fewer surprises mean fewer returns.
Beyond that, professional-looking photos just feel trustworthy. Shoppers associate clean visuals with a legitimate, established brand. That perception alone can lift your conversion rates.
How Do You Keep Results Consistent Across Your Catalog?
Use an identical lighting setup, camera angle, and distance on every shoot, and build editing templates so each image is treated the same way. Document clear guidelines for the team, and review the catalog regularly so small inconsistencies are caught early.
Use the same lighting setup every single shoot. Keep your camera angle and distance identical across products. Build clear guidelines for anyone on your photography team to follow. Create editing templates so every image gets treated the same way.
Check your catalog regularly too. Small inconsistencies add up and make your brand look disorganized.
FAQs About Ghost Mannequin Photography

-
How long does a ghost mannequin photography shoot take?
It depends on the number of garments. A single item takes around 15 to 30 minutes to shoot properly. A full collection of 20 to 30 pieces can take a full day. Planning your shoot in advance cuts time significantly. Having garments steamed and ready before the shoot also helps a lot.
-
How long does post-production editing take per garment?
A simple item like a t-shirt takes around 20 to 40 minutes to edit. Complex garments like structured jackets or layered dresses can take over an hour. If you outsource to a professional editing service, most providers deliver within 24 to 48 hours. Rush orders are usually available at an extra cost.
-
How much does ghost mannequin photography cost?
Costs vary widely. In-house shoots cost more upfront due to equipment investment but save money long term. Hiring a professional studio can cost anywhere from $25 to $75 per garment depending on complexity. Outsourcing editing alone typically costs $5 to $25 per image. Bulk orders almost always come with discounted rates, so ask before you commit.
-
Do I need a special mannequin for this technique?
Yes, ideally. An invisible or hollow mannequin is the best choice. These mannequins have removable parts, like the neck, chest, and arms. Removable parts make the editing process much faster and cleaner. You can use a standard mannequin too, but it adds extra editing time and complexity.
-
What is the hardest part of the ghost mannequin process?
The inside-neck shot is where most beginners struggle. Getting that shot aligned perfectly with the main garment image takes practice. Poor alignment creates visible gaps or unnatural blending. Another common difficulty is dealing with sheer or lightweight fabrics. These materials shift easily on the mannequin and can distort the garment’s natural shape.
-
Can ghost mannequin photography work for all types of clothing?
It works for most garments. Shirts, dresses, jackets, trousers, and knitwear all photograph well with this method. However, very loose or flowy garments like silk scarves can be tricky. They often need internal support like foam or pins to hold their shape. Very flat items like ties or belts may not benefit as much from this technique.
-
What software do editors use for ghost mannequin editing?
Adobe Photoshop is the industry standard. Most professional editors use it for clipping paths, layer blending, and shadow creation. Some also use Lightroom for color correction before the final export. Free alternatives like GIMP exist but lack the precision tools that Photoshop offers. For high-volume work, Photoshop remains the most reliable choice.
-
Is it better to outsource ghost mannequin editing or do it in-house?
Both options work depending on your situation. In-house editing gives you full control and faster communication. But it requires a skilled editor and proper software. Outsourcing works better for high-volume brands or those without editing expertise. Many professional retouching services specialize in fashion photography and deliver consistent results quickly. Weigh your volume, budget, and quality needs before deciding.
-
How do I ensure consistent results across a large product catalog?
Consistency comes from setting strict standards early. Use the same camera, lens, lighting setup, and backdrop for every shoot. Maintain identical camera distance and angle across all products. Create a style guide that your photographer and editor both follow. Review images in batches before publishing so inconsistencies get caught early.
-
Can ghost mannequin photography work for small brands with a tight budget?
Absolutely. Small brands do not need a big studio setup to start. A decent camera, a hollow mannequin, two softbox lights, and a white backdrop can produce great results. Free trials of Photoshop or affordable editing tools can handle basic post-production. As your catalog grows, you can invest more or shift to outsourcing. Starting simple and scaling up is a perfectly valid approach.
-
Is ghost mannequin the same as invisible mannequin?
Yes, they are the same technique. “Invisible mannequin” and “hollow man” are common synonyms for ghost mannequin photography. All describe shooting a garment on a mannequin, then editing it out so the clothing keeps a natural 3D shape with no visible support.
-
Ghost mannequin vs. flat lay vs. on-model: which is best?
Each suits a different goal. Ghost mannequin shows true 3D shape with no distraction, ideal for catalogs. Flat lay is cheapest and fastest but looks flat. On-model shows fit and styling but adds cost and inconsistency. Most brands lead with ghost mannequin.
-
Can ghost mannequin editing be automated with AI?
Partly. AI tools now handle background removal and basic cutouts quickly, but the inside-neck blend, edge refinement, and shadow work still need skilled editors for clean results. A hybrid approach, AI for speed plus human finishing, gives the most reliable catalog quality.
-
How many photos per garment does ghost mannequin need?
Usually two to four shots per garment. A basic shirt needs a main shot plus an inside-collar shot. Dresses, jackets, and trousers often need extra angles for silhouette, openings, or waistbands. Planning the short list per garment type avoids reshoots later.
Final Thoughts
Ghost mannequin photography is not just a trend. It has become the standard for fashion e-commerce.
Done right, it removes distractions and puts the spotlight entirely on your product. It takes the right equipment, solid lighting, and skilled editing to pull off. But brands that invest the time see real results: more trust, fewer returns, stronger sales.
Start with the basics from this guide. Build from there. Your product photos, and your bottom line, will thank you.


