How to Blend Colors in Photoshop: Step by Step Tutorial

Before you even learn how to blend colors, you must know why do you need to do this? Well, many times, we see images showing up dazzling from all perspectives. But only because of isolated colors in certain areas, they can’t be called picture-perfect. This flaw in images or shapes can be fixed easily by blending colors in Photoshop.
There are a number of techniques you have at your disposal to blend isolated colors. You aren’t limited to following any particular method. In Photoshop, you have got enormous tools letting you mix or blend colors. Depending on your preference, style, and goal, you are free to make use of any of them.
Learn How to Blend Colors in Photoshop
In this tutorial, we will showcase 2 simple and easy methods of blending colors in Photoshop. Once you learn these techniques and master them, you can bring out professional output in no time.
So, let’s get started…
1. Open Photoshop and Duplicate the Background Layer

At first, open Photoshop, create a new workspace and duplicate the background layer. You can do that by right-clicking the background layer or pressing Ctrl + J.
2. Select the Rectangular Marquee Tool

Now, select the Rectangular Marquee Tool from the toolbar and draw a rectangle on the selected canvas.
3. Choose a Color and Select the Brush Tool

As the purpose is to blend colors, we have to pick two different colors for the rectangle. At first, choose a visible color using the color picker and select the Brush tool.
4. Choose the 2nd Color and Paint the Shape with Both Colors

Then, paint over the rectangle partially with the chosen color using the Brush tool. After that, choose another color to paint over the rest of the rectangle.
5. View the Shape With Isolated Colors

Once the painting is done, the rectangle looks filled with two different colors. But the colors look discrete and isolated.
6. Select the Mixer Brush Tool
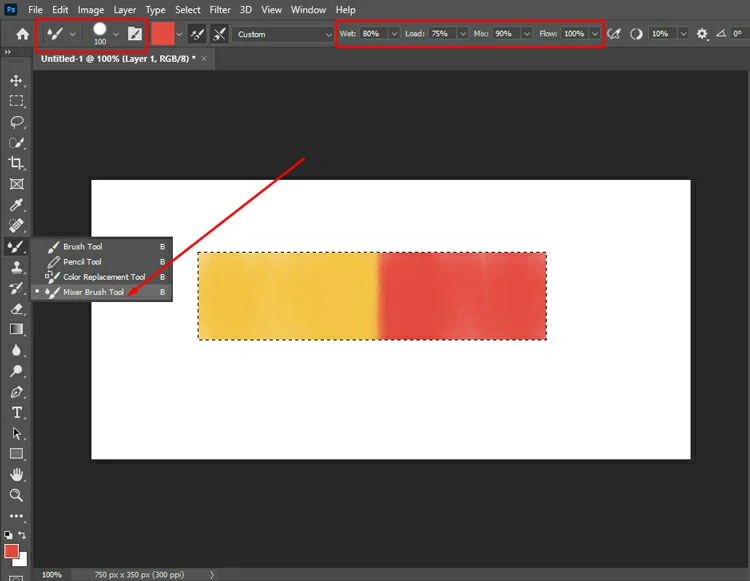
Now, select the Mixer Brush tool, adjust the size and softness/hardness of the brush, and set other parameters as visible in the screenshot below.
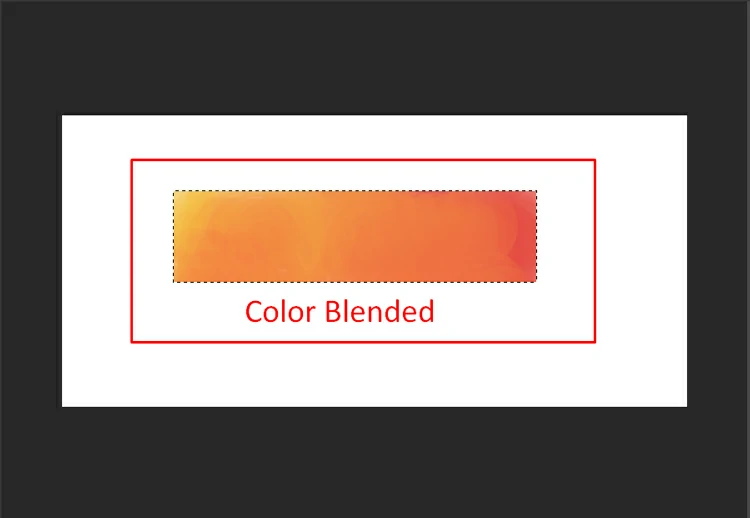
7. Paint Over the Colors and Get the Final Output
Free Service up to 5 Images
After that, paint over the colors smoothly with a deft touch and keep painting as long as you don’t achieve the desired result. Finally, the rectangle shows up with the colors blended.
You may also read– Photoshop Layer Blending Modes Detail Guide With Examples
2nd Method
1. Open Photoshop and Duplicate the Background Layer

Just like the earlier method, start by opening Photoshop, create a new workspace and duplicate the background layer. You can do that by right-clicking the background layer or pressing Ctrl + J.
2. Select the Ellipse Marquee Tool

Now, select the Elliptical Marquee Tool from the toolbar and draw an ellipse on the selected canvas.
3. Choose a Color and Select the Brush Tool

Since the aim is to blend colors, we have to choose two different colors for the ellipse. Firstly, pick a visible color using the color picker and select the brush tool.
4. Choose the 2nd Color and Paint the Shape With Both Colors

Then, paint over the ellipse partially with the chosen color using the brush tool. After that, pick another color to paint over the rest of the ellipse.
5. View the Shape With Isolated Colors

Once the painting is finished, the ellipse looks filled with two distinct colors. But the colors look entirely isolated.
6. Select the Soft Round Brush

Now, select the soft round brush from the Options bar, adjust the size and softness of the brush, set the Opacity to 20%, and adjust the other parameters as displayed in the screenshot above.
7. Paint Over the Colors and Get the Final Output
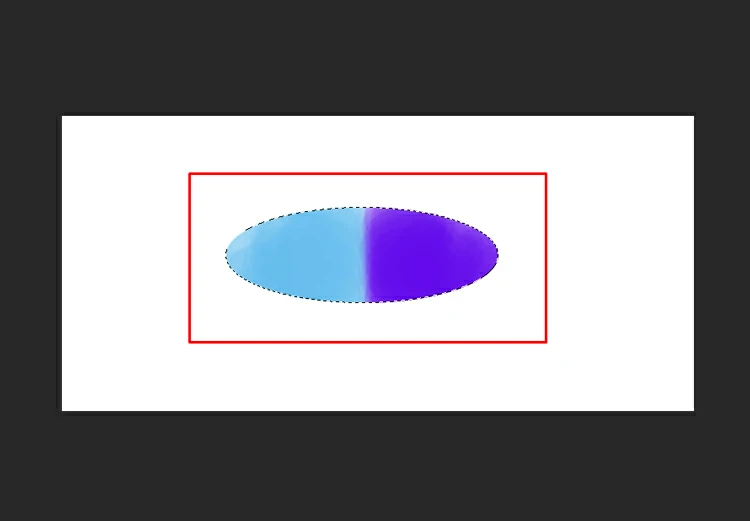
Next, pick the Color Picker tool by pressing the Alt key, and paint over the colors selecting colors from the left, right, and the middle of the ellipse to blend colors with perfection. Finally, the ellipse appears with the colors blended.
You may also check- How to Use Gaussian Blur in Photoshop.
Ending Lines…
That’s all for this tutorial. We have walked you through 2 amazing techniques of blending colors in Photoshop. There may be some other techniques available adopted by Photoshop users. But if you are looking for professional results, these two are the best methods without a doubt.
We hope you guys have benefitted immensely from the tutorial. Keep practicing the color blending edits with different images having unblended colors. You will master this simple and easy editing action slowly and steadily.
Visit our website to know more about our Photoshop tutorials and also don’t forget to get a glimpse of the core image editing services that we offer.


