How to Remove Watermark in Photoshop (Easy Steps)

At the beginning of this content, we want to define our position. It is not for teaching you how to steal images of others removing watermarks, rather the motif of sharing the technique of removing watermarks in Photoshop is to make you know how you can reuse already watermarked images that you own.
For different purposes, you may want to use the same photo again instead of arranging another photoshoot. But you have given watermarks on the images in Photoshop. In that case, you can use the vanishing watermark technique utilizing the fantastic Photoshop tools.
Step by Step Tutorial to Get Rid of a Watermark on a Picture
Wondering about how to remove a watermark in photoshop? We will try to present real-time work step by step so that you can clearly understand the way of removing the full watermark in Photoshop. We are directing the experiment in the most recent version of Photoshop to get the best Photoshopping output.
Step 1
Open an image containing a watermark in Photoshop to remove the watermark. Look at the below image. We are going to remove the before-after marks and the watermark as well.


Step 2
To remove the before-after marks, at your first attempt, take a selection tool. Here, we are taking the Rectangular marquee tool to make a selection of the ‘before’ marks.

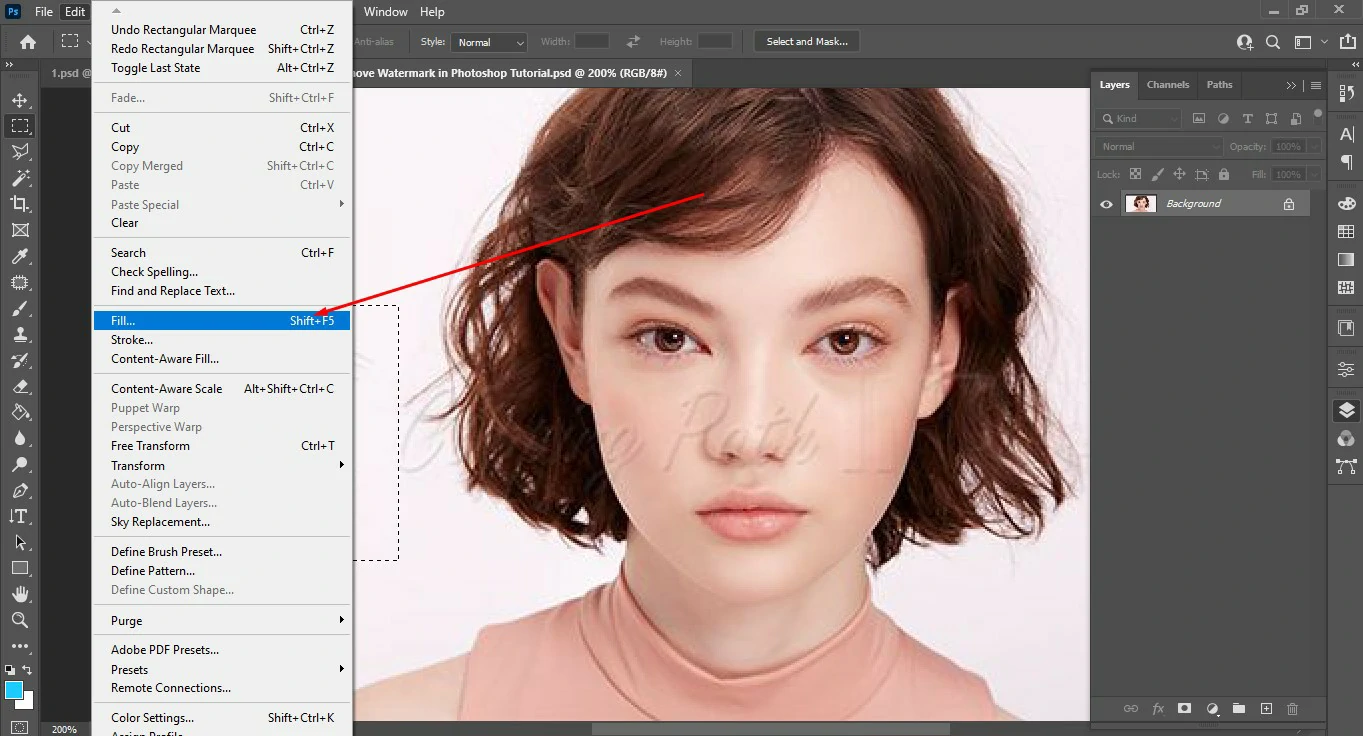
Step 3
Press the right button from your mouse on the selection and click on the Fill option. You can go to Edit from the top bar and click on the Fill option from the dropdown option.
Note: If the Fill does not work, you may need to rasterize the layer by right-clicking on the layer and selecting “Rasterize Layer.”

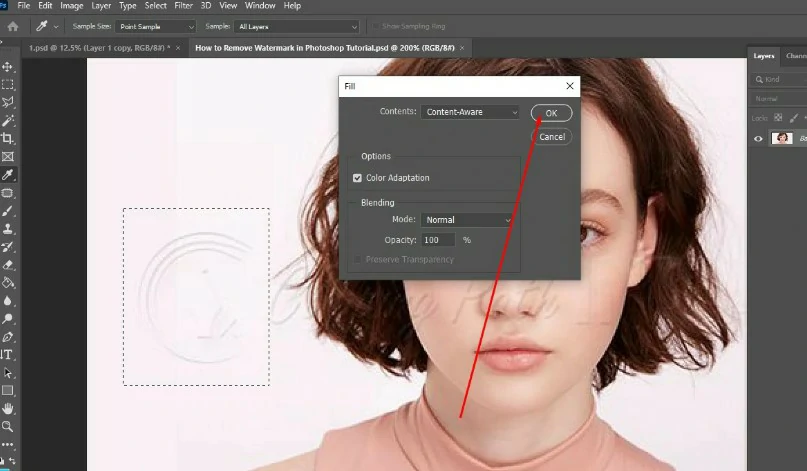
Step 4
Once you click on the Fill option, you will get another dialogue box. Select the Content Aware Fill and click on OK. Now see the magic.


Then, what happened here? The Content-Aware Fill tool is the brother of the Clone Stamp tool where we manually take a sample and fill the area we want to remove or hide. The same process is happening here automatically.
Content-Aware Fill is sampling the same color from its around and filling the area. Thus, we’ve got a clean area or whatever result we expected.
Now let’s remove the watermark by applying the same process of Content-aware.
Step 5
Zoom the image until it gets distorted.

Step 6
Take the Lasso tool here in lieu of the Rectangular marquee tool since the edges of the watermarks are not straight as it was in the case of the before-after marks that we removed earlier.

Final Step
Using the Lasso tool, select the watermark part-by-part and apply the Content Aware Fill to fill the area with the necessary color. Do the work patiently and spend time to gain the best result. See the below snapshot that we have worked on and removed the watermark successfully.

Remove Watermark Using the Patch Tool
The patch tool is one of the most useful tools in Photoshop. You can use it in many different ways to remove things from a photo, like removing blemishes or watermarks. It’s used a lot to remove unwanted things from your picture and avoid distractions. So, without further ado, let’s begin with the next technique.
Step 1
Like the previous one, open the image in Photoshop by clicking on the File tab to Open ( File>Open ). Then select the photo you want to get rid of the logo or watermark from. However, you can easily do it just by dragging and dropping the watermark image.
You may also read: How to Add a Watermark in Photoshop
Step 2
Select Rectangular Marquee Tool or the shape tool that fits the watermark. Then, while holding down the right mouse button, drag over the marks.

Step 3
In order to get rid of the watermark, use the Photoshop “Fill” tool which blends with the surrounded color and makes it easier to continue doing the same thing.
Step 4
“Patch Tool” helps to replace a selected area with pixels from another or the same part of the image. Which we think works fine for doing it so far. Take a look at the given GIF below to see how easily it removes the watermark from the image.


Final Output

If you want to remove watermarks or any other spots or texts, including unwanted objects, you can go through the same process that we have shown here.
And if you have photographs with unwanted objects, we can fix them for you. Our object removal service can get rid of anything you don’t like from your image and make it look better.


