How To Model a 3D Mug In Autodesk Maya

Building 3D models is a great way to showcase your design ability and professionalism in the field of 3D modeling. Autodesk Maya is a popular 3D modeling program that you might use for modeling or animating your characters. In this tutorial, we are going to explain how to create a coffee mug from scratch using Autodesk Maya. We will start with basic primitives and sculpt the model using those shapes, gradually refining it.
You may also read- Impacts of 3D Modeling in Ecommerce.
What is Autodesk Maya (with Features)?
Maya is a 3D computer animation software that has been developed by Autodesk, a 3D software development company. The main purpose of this software is to create 3D animations and visual effects for movies, video games, and other media productions.
Maya was first released in 1993 and it has been used by many popular studios like Pixar and DreamWorks in their productions. It is currently one of the most popular 3D software tools used in Hollywood and around the world.
Autodesk Maya Features
User Interface: Maya offers an intuitive user interface that makes the software easy to learn for beginners yet offers enough advanced features for professional users. The software’s simple drag-and-drop interface lets you quickly set up scenes with characters, lights, cameras, and more.
Modelers: Maya provides a variety of tools to model your 3D assets. Use the NURBS, Subdivision Surfaces, or Polygon modeling tools as per your needs.
Animation: Maya’s animation tools let you animate objects in a realistic manner, with keyframes and splines for curves, constraints for posing different body parts together, etc. You can also create hair dynamics using FK/IK constraints for more realistic results.
Rigging: Rigging lets you control how your character moves by defining its skeletal structure using bones that connect the skeleton’s joints and make it move realistically as humans do in real life. This process involves connecting the bones with skin weights so that they move correctly when animated through keyframes or motion capture data.
Toolset: A new toolset for enhancing the user experience with content creation and visualization, including enhancements to MASH and Alembic support, improvements to Syphon export, and more.
You may also read- Benefits of 3D Modeling and rendering in Various Industries.
How To Model a 3D Mug In Autodesk Maya
If you have ever wanted to learn how to model objects with Autodesk Maya, this is a great tutorial for you. The tutorial will walk you through the steps of modeling a 3d mug from scratch in Maya. So, let’s get started.
1st Phase: Modeling the Mug
Step 1: At first, open Maya & you’ll see the default screen. Input the image plane there.

Step 2: Now, create a poly cylinder and scale object.

Step 3: Adjust the image plane.

Step 4: Then, select the edge.

Step 5: From polyBevel option, set the Fraction value= 0.1 & Segments value=3.

Step 6: To create extra segments, go Insert Edge Loop option from the Mesh Tools menu.

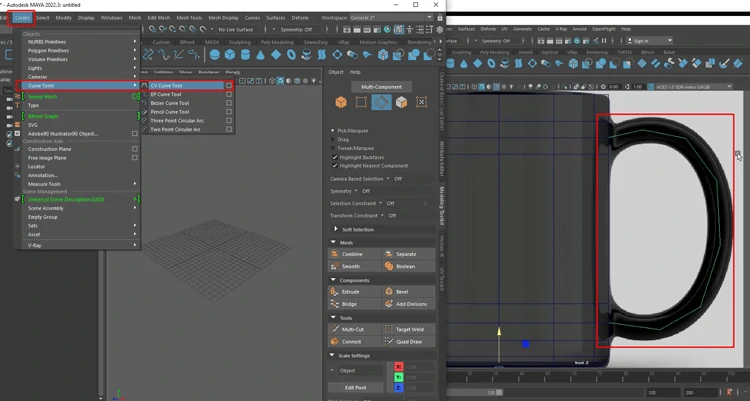
Step 7: Create curve line to make mug handle. Go create menu> Curve tools>CV Curve tool.
Step 8: Now, to create polymesh, go Create menu > Sweep Mesh. Customize the parameters according to the requirements.

Step 9: Select Object Face. Go Edit Mesh> Extrude. To start with Center Gizmo, click on Global switch. Then, scale the selected area.

Step 10: Extrude again. To create the mug hole, click Gizmo and go down.

2nd Phase: Lighting and Rendering
Step 1: Open Maya and change the default settings according to the necessity. Then, click the dropdown menu and select V-Ray.

Step 2: From Render settings, click the dropdown menu and select your resolution.

Step 3: Then, from toolbar menu, click Windows > Rendering Editors > Hyperhshade.

Step 4: Select VRaymtl1 and click on the Model. Hold on right click and select- Assign Material to Viewport Selection.

Step 5: Now, assign VRayplane, VRayLightDome, and directionalLight.

Step 6: Go VRay Tools menu> VRay Material Library Browser. Then choose your material and implement to model.

Step 7: Hold on right click and keep applying the material to the selected object.

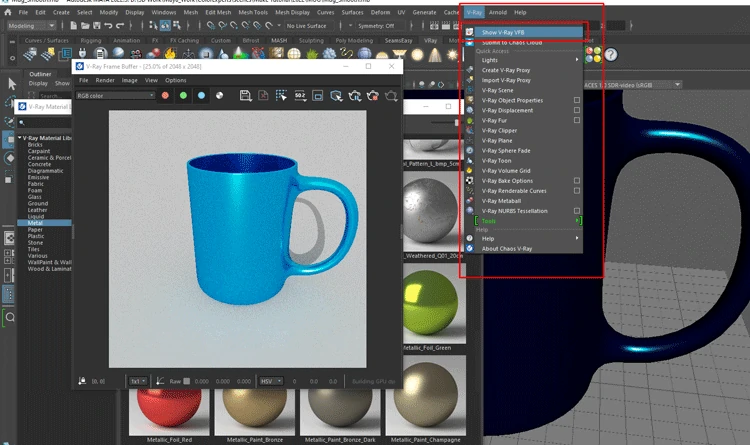
Step 8: Go to VRay tab > ‘Show V-Ray VFB’ and adjust light settings to bring the appropriate output.
To Conclude
There you go with the guidelines. I hope that this article helps someone to start with 3d modeling. Keep in mind that learning Maya is a long process, it is not easy and you need hard work if you want to achieve something. 3D modeling decisions would be easier to make if you stick to one user interface style, but there are always exceptions to the rule and so you can use whatever you are most comfortable with.
You may also read- 3D Modeling Mistakes and Tips to Avoid them.
Hopefully, you now know the fastest and easiest way to model a 3D Mug in Autodesk Maya. Take your time, and make sure to follow all of the steps above. We’ll be more than happy to assist you in your quest for 3D Mug modeling greatness.