How to Make Your Own Meme in Photoshop (Easy Steps)

Have you seen those memes about cats and felt the urge to share them? Learn how to make a meme in Photoshop so you can easily create an image that triggers your emotions. You’ll have a lot of fun with the whole process, including after when it’s done!
There are several reasons for creating meme-like disclosing a complex idea into a simple idea, making the idea viral on social media, and pick up more likes and shares, turning an innovative idea into amusing color, etc. At the same time, it is also an opportunity to spend leisure and make people giggle.
Easy Ways to Make Your Own Meme
Let’s be honest with ourselves, shall we: memes own the internet. There are thousands of memes online and they are being shared millions of times every single day. Indeed, there is a seemingly unlimited amount of subtle alterations and varieties out there with each pointing out a different detail. But, what makes a popular meme? Is it humor, detail, or perhaps originality?
We’re going to learn everything about this topic and you can be sure you’ll have enough knowledge afterward. Just follow the steps to make your own meme in Photoshop.
Step 1
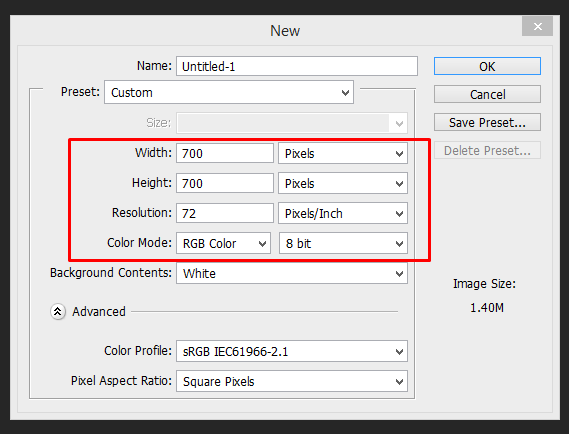
Open a new Photoshop document. To execute this, go to File and click new or hit Ctrl+N. Set your image size to any suitable size to have sufficient space preferably to 700×700 pixels and press OK.
Step 2
Inverse the background into the black by pressing Ctrl+I. If you want to resize the background layer, unlock the background layer by double-clicking and hit Ctrl+T.
Step 3
To use an existing image, download it and drag it to the Photoshop canvas. After that, select the image in the layer panel and press Ctrl+T to regulate the size of the image in the desired position.

Step 4
Now, press T to use the type tool. Set the text color to white and choose the impact font. Write the text at the top of the image. Instead of writing the bottom text, you can duplicate the top text layer by hitting Ctrl+J or by right-clicking the top layer and selecting the Duplicate Layer option.
Then, you can move the text at the bottom and modify the text to display.

Step 5
After that, you can add blending options to beautify the meme. To accomplish that, go to a specific layer. Select a specific layer and double click on it to choose the blending options like drop shadow, outer glow, stroke, etc.

Step 6
Finally, save the meme. To perform that go to file and select the save for web. Select PNG-24 and click save.
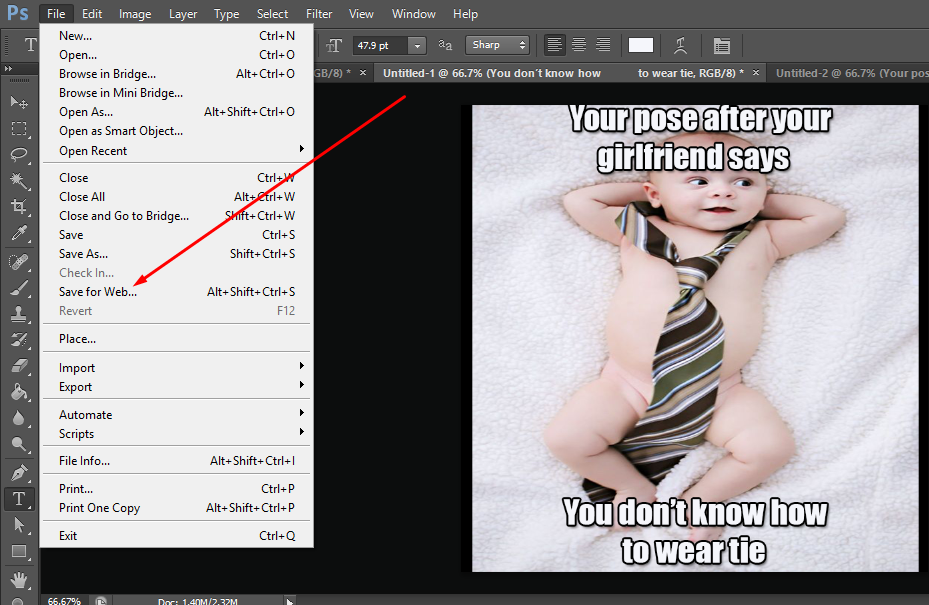
Here Is How Our Final Meme Looks Like

With the rapid development of technology, people are innovating and enjoying all the latest trends. Memes are a social phenomenon in which web-savvy people often create and entertain others.
As it is a sort of witty joke, it can bring jubilation even to a dejected person. Normally, it is an innate tendency of human beings to feel delighted by making others laugh and meme plays a vital role to do that.
However, it should also be remembered that meme doesn’t spread because it is good rather it spreads because it deserves to be spread. This tutorial will help you enormously to create your own meme for free and have unlimited fun. Visit our website to know further information about us.


