Ghost Mannequin Photography Shooting & Editing

The ghost mannequin effect has a great role in the eCommerce business. If you are not a Photographer, then you might have seen it on many ecommerce sites. But, for a fashion and product photographer, a ghost mannequin is a part of life.
This effect is created by cutting out various types of mannequins from the image to get a ghostly look. It has the capability to create a positive impression among the customers in making decisions for purchasing any garment and/or jewelry items. It is also the most cost-effective way because you don’t need to use expensive models and wait for their schedules, moreover you also do not need costly mannequins. Mannequin helps to make your product photos look professional and lifelike holding their proper shape or figure. Such a quality product photo increases the demand for the products to the customers.
For amateur photographers, it appears difficult to create the mannequin effect, but actually, it is very easy for skilled photographers. Creating a mannequin effect to the ecommerce product photo is a joint procedure of the photographer and the graphic designer.
In this article, you will know how to create a mannequin effect during photography, what types of mannequins are necessary for this effect, how designers remove the distracting mannequin maintaining a hollow effect, and so on.
Get Prepared for Product Photography

The first thing comes first. For ecommerce product photography, a well-equipped studio is essential. There should have a proper lighting system for highlighting the products without any bad shadows. Some umbrellas are very useful for light management. You should have white-colored light along with a white background that may be whiteboard, wall, foam, cloths, etc. For rendering lights properly, some white foam-board can be a good addition. Some other small, but important things such as clips, tape, hanger, soft papers, tissues, tripod, stands, tab, or computer will add extra advantages to your studio.
You must need various types of plastic mannequins for creating hollow effects. In this case, you can use a human as a model instead of a mannequin, but this can be more money-consuming. However, the last but the most important thing that you must need is a high-quality camera. If you can manage all this equipment together, now your studio is prepared for shooting product photos.
How the mannequins should be
Direct use of mannequins with the clothes on is well suited in retailers’ shops, but in online stores. The ghost mannequin effect is created by photography and/or photo editing. You can use various types of mannequins as your products require for ghost mannequin photography.
If you want to take photographs of the tops, skirts, shirts, or something similar, for the upper portion of the human body, you have to use a half-length mannequin. In the same way, you can take the mannequin for the lower portion of the body for shooting the photos of pants, trousers, shorts, etc.
It should be white, other colors gets into the dresses
The background during ghost mannequin photography always should be white. It is not only in the case of cloth images but also for most product photos. Because, if the backdrop is colorful, there is a chance it gets into the dresses or other product images. If it happens, removing the mannequin and to joint neck area later becomes difficult. As a result, ensuring high-end quality at the time of clipping path or other image editing services becomes almost impossible.
Type of Mannequins and their Likes & Dislikes

Half Body White Mannequins
To shoot the photo of the shirts and pants or the long women’s dresses, you should take the mannequin of full body shape. But, for shooting the photos of only shirts, t-shirts or women’s tops, you can take half body mannequins. In the same way, for pants, trousers you can choose the lower half mannequin. There are lots of variations in the sizes of mannequins. You can take any of the sizes as your product demands.
Removable Invisible Mannequin
There are mannequins that can be divided into different parts to have perfect product photos. You will get transparent mannequins also for having photos. These mannequins perform the same purpose, but yet you cannot use the product image without editing or removing these objects in photoshop.

Transparent Mannequin
You can also use transparent mannequins for shooting your product photos. It results in the same as the other mannequins do. It looks pretty and sometimes you can use these images without editing, but for making highly attractive and converting images there is no alternative to taking ghost mannequin effect service by Photoshop.
Human Mannequin
The human model can be used instead of mannequins for shooting the product photos. The model must be in perfect shape and responsive. During photography from multiple angles, s/he must wide hands for the details.

Prepare your studio
For creating the ghost mannequin photo, you must need a well-equipped and properly decorated studio.
There must have a camera on a tripod, two umbrellas with light equipment for proper light management, plastic mannequins, and other equipment. You have to keep a whiteboard for white backgrounds. You may use this room computer for image editing.
Camera Setting: Camera setting is a very important task. You cannot take good photograph thou you are an expert and have enough skill & experience until your camera is properly set. Besides, you must have a sound knowledge of ISO, Aperture, and white balance.
- ISO: It should not be greater than 600-640. Because, the more ISO, the more noise. To have a clear or sharp product image, always keep less ISO.
- Aperture: It is applied to focus the image. The higher number of Aperture helps to get a wide range of areas in focus. Make Aperture more than f/11 that will capture more aspects of the product image.
- White Balance: A proper white balance setting can control nicely how the camera interprets the various colors that it records. It is necessary to remove or reduce the orange or blue color.
For setting this equipment in the proper place, the studio room must be quite large. The room should lone and white in color that helps to get expected product photos.
How to shoot ghost mannequin photograph
We will show how to shoot ghost mannequin photographs of the various types of ecommerce products here step by step.
For taking the photo of a shirt, you have to position the camera directly level with the chest area. To focus on all the parts, it is very important.
Again, to get the photograph of a pant or something like this bottom cloth, it is important to make the camera level with the hip area. This type of positioning is a must to avoid looking tapered and inaccurate in the case of garment items.
-
Upper garment items (shirt, t-shirt, jackets, hoody)
To take a ghost mannequin photo of a full sleeves shirt, t-shirt, jackets, hoody, and so on you have to be very careful and do these specific tasks such as-
- Firstly, ensure a mannequin with longhand because a handless mannequin is not suitable for such a product’s photo.
- Put the shirt on the mannequin. If it is separable, remove it from the neck area to make visible the back part.
- Remove the extra tapered and folding area. If you need, use some pins.
- Give extra concentration on the area between arm and body to remove excessive folding and texture.
- Make the chest portion tighten clipping behind the mannequin, but be careful to keep some natural folds so that it looks real. You can fold the cuff to show the inside details if you think it needs.
- Then, check the light, background, camera, and take the photo of the front part.
- Now, you have to take the image of the back part and for this reason, clip the front parts to make the back tighten and shoot the photo.
- You must take the image of the inside of the neck area so that the designers can add this after removing the mannequin in photoshop.
- By this way, the photographers generally take a perfect ghost mannequin photo of the upper garment products.
Ref: https://youtu.be/yqvYBIPqr2U
-
Lower garment items (pants, trousers, pajama)
To take the photograph of pants, trousers, pajamas, etc. you can use half-length mannequins. Besides this, what you should do are:
- At first, put the dress pant on the mannequin.
- Try to make it fit with the mannequin.
- Use clips behind the pant to make the front side tight.
- If any portion remains tapered, use paper or tissue to fix it.
- You can fold the bottom to show the detail of the lower part.
- It is also possible to have a ghost mannequin photo of the jeans pants keeping on a flat line.
- Just enter some thick paper inside the pant.
- Ensure the natural bend around the knee.
- And finally, take the photo from the top position.
- In this way, you can get a ghost mannequin photo of the lower garment items.
Ref: https://youtu.be/DDMiWkRXFKA
Ref: https://youtu.be/fcS8MrxYgSU
-
Long garment Items (wedding dress, lingerie, shirts & pants together)
For taking the ghost mannequin photos for the long cloths like wedding dress, shirts & pants together, etc. you have to do the things as follow:
- Take a full-body mannequin.
- Put the dress on the mannequin.
- Use clips for making tight the front part and the reverse also.
- Use a pin, tape for straightening the dress.
- Maintain proper curved shape in case of women cloths
- Set a contrasting background for some specific clothes like a white wedding dress, wool dress.
- Here proper light blending and positioning of the camera are very necessary.
- However, finally, take the photo.
How to remove mannequin from product photo
Since the product images with mannequins cannot be used directly in ecommerce store, these objects need to be removed from the product image for business purposes.
However, for the ghost mannequin effect service, the graphic designers need two snapshots of the product image such as the front part and the back or inner part. Suppose, you’ve both the parts of a T-shirt in your hands and do the job as follow:
You can watch our video
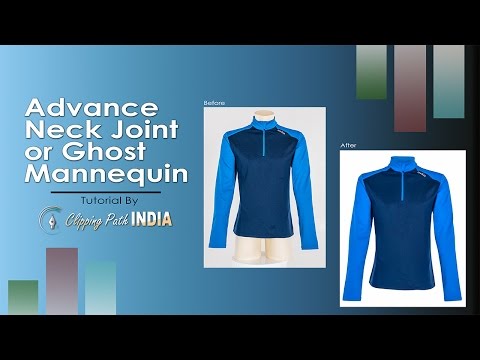
- At first, open the front part of the T-shirt in Photoshop for clipping path by the Pen tool manually for getting 100% accuracy. You can remove the mannequin and unwanted background as well.
- Now, create the path 1 or 2 pixels inside around the image. For accuracy, zoom the image up to 400%, according to the resolution or pixel dimension. There may have too many bad wrinkles, folding, or scratches, and try to avoid these because full accuracy isn’t possible during the clipping path. So, apply Liquify or Warp tool later.
- When the path creation is finished, press Ctrl, click on the path to select it to change the background and it looks good so far. Finally, press Ctrl + J, duplicate the layer, and closing the layer eyeball, make invisible the background.
- When the clipping path of the front part is completed, then the time is for the back or inner part. Open it in Photoshop.
- Take it as a 2nd layer as the front part is the 1st layer. Press Ctrl + T to select the 2nd layer and make it small as needs. Then, select the Warp Tool for adjusting with the front part.
- Create curves and apply necessary shadows for making the product photo realistic.
- For alignment, use the Liquify tool from the top Filter option of Photoshop. At the time of taking the photograph, accurate alignment isn’t possible always.
- Using the Eraser Tool, remove the hard shadow from the joint area to bring soft shadow and fix the corner area by Liquify.
Thus, you can remove the mannequin in photoshop maintaining the ghost mannequin effect.
Ref: https://youtu.be/gjR_tw8yIDE
Troubleshooting
During ghost mannequin photo shooting, from the beginning to the end, you may face many troubles regarding many important issues. But, if you follow some specific steps, you can avoid most of them, or later you can fix them properly. For Instance:
- Select a large room for your photography studio so that you can accommodate all the necessary equipment like a Camera, Umbrellas, Tripod, Light Stand, Backdrop, computer, and more.
- Keep all the required equipment in touch your hand before shooting photographs.
- Set a white backdrop or contrasting background of the product color. If the product color and background become the same, the product will not come into focus properly. Besides, before photography, one should keep in mind the background of the website where the image will be used.
- Try to utilize the natural light and for this, set your platform just by the side of a window. Always, keep enough light to capture the product with detail.
- Get two umbrellas and position them spreading light accurately.
- Set your camera on a tripod properly and in this case, heed to the perspective, ISO, Aperture, White balance, etc.
- Choose the right mannequin for your product photography. For the product of the top portion, you can take the mannequin of the upper part of the body, lower part for the product, and in case of the full-size product, get a full-body mannequin. You can take a separable mannequin.
- Dress up the mannequin with your garment items properly. If the dress is very big and loose, then use some clips, pins, or tape for fitting it with the body. In the case of human model, tell to spread her/his hands.
- Remove mannequin from your product images in Photoshop. Because a product photo with a mannequin in an online ecommerce store is not suitable to catch the customer’s positive impression.
- Take ghost mannequin service from a company because if you try to edit images by yourself, it will consume your valuable time, rather spend time to gather more clients and photography.