Top 11 Photoshop Architectural Rendering Tips For Beginners

Photoshop architectural rendering is the process of creating 2D or 3D images or animations showing the attributes of a proposed architectural design. From this rendering, we can learn what an architectural establishment would look like once it is built. Photoshop is a great tool for architects involved in various creative spheres. Architects can turn even blend images or illustrations into beautiful architectural projects by using this software. But if you are just beginning to work with this software, we have some important Photoshop architectural rendering tips which you can follow for your ease.
Top 11 Photoshop Architectural Rendering Tips
Photoshop is a highly popular software among architects because of its user-friendly interface and the availability of thousands of video tutorials. You can improve your existing architectural renders or create a new one in Photoshop. Below we are describing the top 11 photoshop architectural rendering tips for newbie architects so that they can perform rendering better and faster.
1. Systematic Workflow

When you have full control of your project’s structure, you can get the best results from architectural rendering from photoshop. You must make sure that you can move a few steps forward or backward without losing your progress.
You can achieve such kind of flexibility by using masking and adjustment layers. Masking allows you to alter a specific area of a layer without changing the entire content of the layer.
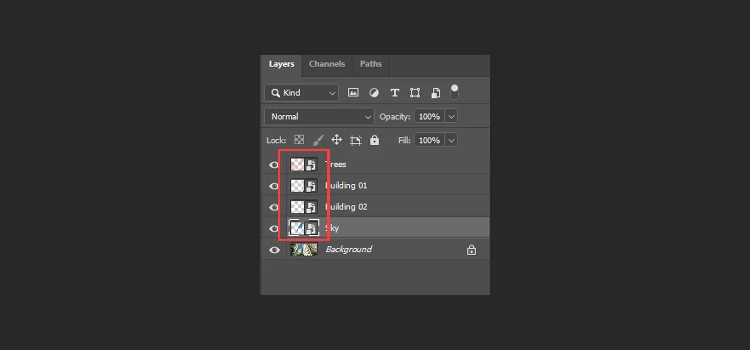
2. Organized Layers

Photoshop architectural rendering files tend to be quite complex and messy. But you can always try to minimize the number of layers to as low as possible. For that purpose, you may group the layers based on their contents. You can follow the below criteria to group the layers in folders.
- Base Files (line work, base rendering, Alpha, etc.)
- Sky
- Background (surrounding buildings, landscapes, trees, etc.)
- Ground Plane (roads, pavement, grass territories, etc.)
- Interiors
- Plants, People, and Transport
- Visual Effects (color overlays, lens flares, etc.)
- HDR/Filters/Plug
Also, you should name every individual layer with unique names, so that you do not forget which layer has got what elements within it.
3. Use Smart Objects
Sometimes you just add a photo to the canvas and zoom in only to notice that it becomes pixelated. This problem can easily be solved by applying Smart Objects. This is extremely important in photoshop architectural rendering projects as once converted to smart objects, it is possible to resize, rotate, alter/make changes to the image. These changes will not decrease the image quality, which is impossible in the case of rasterized images.
Smart objects also allow you to preserve the changes made in Free Transform. So you can adjust or delete those changes at any stage of the project. It is also possible to duplicate the smart objects.
4. Use Hotkeys To Save Time

Photoshop architectural rendering requires switching menus, adjusting settings, and choosing different tools. This is actually a time-consuming process, so you may want to speed it up. The easiest way to do so is that you memorize and use the essential keyboard shortcuts.
When you use them, you can immediately select different functions and tools. Below we are going to share a list of the most frequently used keyboard shortcuts which will definitely increase the speed of Photoshop architectural rendering.
5. Save Time On Color Sampling

Many beginner designers who still have not watched a lot of photoshop tutorials, often import images in photoshop only for color sampling. This takes a lot of time out of them. Instead, a better approach in photoshop architectural rendering is to use the eyedropper tool for sampling. Click on it and hold the left mouse button, then move the tool to the color point in the image that is to be sampled. This can be done on an image, a desktop picture, a webpage, etc.
6. Protect Your Work

As a professional designer, it is no doubt that you will have to share your work with potential clients. That is the reason you must protect your works so that they can not be used by unauthorized users. You can try adding a watermark to your images.
However, this may not be the best option available out there. Instead, you should make your files password-protected so that they can not be edited or printed out. To do this, you need to save your files in pdf format and add a password in the security and permission menu.
7. Maintain Consistency in Colors

If your Photoshop architectural rendering projects contain multiple images, you should maintain a consistent color palette over all your images. This will ensure a coherent and professional look for your project. You can use the Match Color function from the Image>Adjustments menu.
Just open both the images- the image you want to change and the source image with all the necessary colors- in photoshop. Then apply the color data from the source image to the other one. It is also possible to alter the color intensity and luminance from the same menu.
8. Try Out Filter Before Applying

It takes a lot of memory space and time when applying a filter to an image. If you want to stop wasting your valuable time applying filters to a large number of images just to see how they look, you should apply them only to a small part of your picture.
9. Search For Hidden Pixels
![]()
A large-scale architectural rendering photoshop project usually has numerous layers, smart objects, and textures. So it is not unusual to forget about pixels that are outside of the canvas. To avoid this and find out the hidden pixels, go to the “image” menu and select “Reveal All”. This will increase the size of the canvas and display all the hidden pixels. You can then easily delete the pixels that are unwanted.
10. Do Not Waste Your Time

If you do not want to waste your time in Photoshop architectural rendering, you will need to have an established workflow. There is no end to how much you can change and improve your work. But to avoid being trapped in an endless photo editing cycle, you can set a rough deadline for your work. This will prevent you from applying different cool filters and styles just only to see the effects.
If you are just beginning your career in architecture, you can also take photoshop rendering services from different professional agencies.
11. Add Cutouts

In Photoshop architectural rendering, the designers need to be extremely accurate and make the images look fully realistic. They add people, plants, and objects which they collect free from 3D model sites. These objects are available in png format.
You need to find a suitable cutout and adjust it to the scene to make it perfectly matched. You can also add a drop shadow to make the cutout realistic and natural.
You may also read: Top Architectural Photographers To Follow For Inspiration
Conclusion
So we have shared our list of 11 top Photoshop architectural rendering tips which you can follow to improve your rendering process. If you can organize your workflow properly, you will save a lot of time and increase your productivity. When learning Photoshop, you will find numerous tutorials on the internet, but you will have to understand which one is useful to your work and learn them. We hope you enjoy the learning process!


