How to Design a Website Banner in Photoshop Effortlessly?

Does your website banner look dull and boring? Maybe you didn’t get it designed with a professional touch. Perhaps it might be expensive to hire pro web designers for website banner design.
Fret not! No need to hire a pro web designer just to design a banner for your website. You can design your web banner yourself without approaching any professional. Yes, Photoshop lets you design a website banner effortlessly.
Whether you are a newbie designer or a starter in Photoshop, you can design website banners from scratch for a while. Just by following some simple steps, you can design website banners aesthetically and professionally.
How to Design a Website Banner in Photoshop?
Unlike other tools, Photoshop makes the job of website banner design a cakewalk. The steps below will showcase the easiest method of designing a website banner from scratch.
1. Create a New Document in Photoshop
Right at the beginning, open your Photoshop version and create a new document with the proper website banner dimension. We have set our dimensions to (800×300) to create the document.

2. Open or Drag Your First Image
Now, it’s time to start creating the website banner. For that, open or drag the first image. Then, position it perfectly. Make sure that the image has a transparent background.

3. Open or Drag Your Second Image
Next, go for the second image of your website banner and position it accurately. The image should have a transparent background for this image too.

4. Add More Images or Copy from the Existing Ones
Your website banner can have tons of elements, depending on how you want to display. You can keep adding more transparent images as shown before. You can also copy the already added images in the document if required.
Also, move the created layers up and down as you deem necessary.

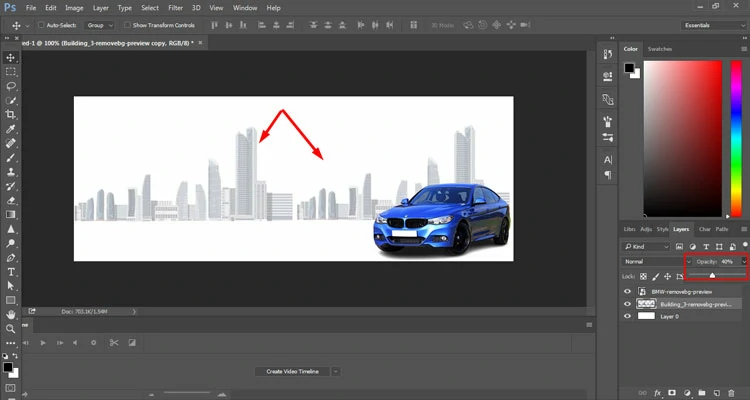
5. Reduce the Opacity of Images
This step isn’t a mandatory one. Depending on the look and visual appeal, you can reduce the opacity of any of the images. In other words, you can increase the transparency of any of the images.
Suggested Article

20 Creative Photoshop Ideas for Beginners to Try in 2023
6. Add Your Branding Elements
To create your brand identity, add branding elements like your company logo, name, tagline, etc. to the website banner. In this tutorial, we have first added the company logo.

Then, we added the company name and a dummy tagline to spice up the design.

Follow the above-mentioned process to add the images for these elements. Don’t forget to make the background of these images transparent.
7. Add Your Brand Color
At this point, complement your website banner by adding your brand color. Make sure to add the color where necessary only. Don’t spoil the banner with mismatching and inappropriate colors.

Suggested Article- Color Theory.
8. Final Output
Finally, add a hook or a CTA button to catch the attention of the visitors. The hook can show up with a catchy button showing text like “Visit Now”, “Grab Now”, “Order Now”, “Join Now”, and so forth.

Here it is! With the help of Photoshop, you can design your website banner effortlessly and attract visitors to your website as well as convert them right away.


