Adobe Photoshop Generative Fill Tool: Let’s Discover Its Power

Adobe Photoshop features a number of AI tools that generate mind-blowing images and stunning visual effects. The latest AI-powered addition to Photoshop is the Generative Fill feature. The tool comes with endless possibilities for photography enhancements that you have never imagined before.
You know the best part? Your skill and experience with Photoshop don’t matter. All you have to do is import your photo on Photoshop and apply the generative fill on it. This special tool will analyze the content of your photo and generate pixels to fill the necessary parts of your photo.
Now, we will drill down to the ins and outs of Adobe Photoshop generative fill and also throw light on the perks and utilities it can offer to photographers, designers, artists, and photo editors.
Introduction to Adobe Photoshop Generative Fill Tool
One of the robust and smashing features of Photoshop’s generative AI arsenal is the Generative Fill tool. This tool leverages advanced AI algorithms to analyze image content and generate new pixels based on that analysis.

The possibilities of the generative fill tool are bottomless— be it seamlessly filling in gaps removing undesired objects or creating incredible visual effects, the Generative Fill tool opens up a world of creative opportunities to do so.
Photoshop Generative Fill Use Cases
As the name reflects, generative fill primarily fills gaps in your images. That means if you have an image that appears to have missing content, Photoshop’s generative fill feature will complement your image by filling the hole.
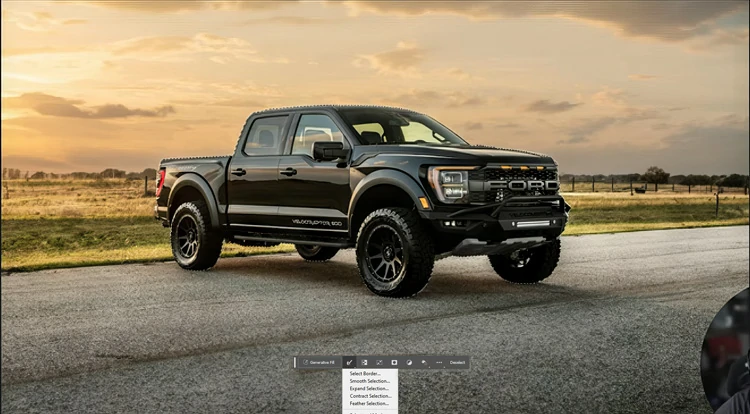
But the “Generative Fill” tool isn’t just restricted to filling the content gap in your image. It can serve multiple other utilities. The image shown below is the original image on which we will apply the generative fill to see the changes.

Object Addition and Replacement
One of the striking features of the generative fill is you can select an area of your image and then deploy a text prompt to define what you envision to add or replace. Shortly, your ideas will show up as a reality in your composition with the power of AI.
- First, open the image in Photoshop.
- Then, select the area of your image where you want to generate the object.
- After that, click on the Edit menu and select Generative Fill.
- In the Generative Fill dialog box, give a text prompt of the object you want to generate.
- Finally, click on the Generate.
- Photoshop will create a variety of options for you to choose from.
- Click on the option you wish to use.
- Click on the OK button to get the output.
Background Generation
With this smashing feature, you can select the backdrop behind your subject and build a new scenario based on a text prompt. This will let you create an entirely new narrative from your image with a matter of a few clicks.

- First up, open the image in Photoshop.
- Then, select the background behind your subject by choosing Select > Subject and then choose Select > Inverse.
- Thereafter, click on the Edit menu and select Generative Fill.
- In the Generative Fill dialog box, add a description of the background you want to generate.
- Finally, click on the Generate
- You will find a variety of options generated by Photoshop for you to choose from.
- Choose the option you want to use.
- Click the OK button to notch up the output.
Image Extension
What if you could extend the canvas of your image and add objects to the empty area? With or without a prompt, Generative Fill can expand your scene, yield striking outcomes that seamlessly blend with the existing content.
- First off, open the image in Photoshop.
- Next, select the area of your image that you want to extend.
- Then, click on the Crop tool from the toolbar. Crop borders displayed on the edges of the photo.
- After that, drag the corner and edge handles outward to extend your canvas size.
- Later, press Enter/Return on the keyboard or the commit checkmark in the Crop options bar. By default, the extra canvas will leverage your background color.
- Next, use the Rectangular Marquee tool to select the extra canvas by clicking and dragging to make the selection.
- Click the Edit menu and select Generative Fill.
- In the Generative Fill dialog box, provide a description of the extension you want to generate.
- Click on the Generate
- Photoshop will generate a number of options for you to select from.
- Click on the option you intend to use.
- Click on the OK
Object Removal
Unwanted objects or elements can botch your entire image. To get rid of such unwanted objects or elements, select the object or element to be removed and let the Generative AI technology delete it with its AI magic.

- At first, open your image in Photoshop and select the object you want to eliminate.
- Next, tap into the selection tools to watchfully outline the area you wish to remove.
- Then, click the Edit menu and select Generative Fill.
- In the Generative Fill dialog box, just leave the text box empty.
- Click on the Generate
- Photoshop will generate multiple options for you to choose from.
- Click the option you wish to use.
- Click on the OK button finally.
Versatility Exploration
Generative fill can go above and beyond the above-mentioned tasks. It can carry out multiple other creative and innovative tasks. So, don’t hold back from experimenting with out-of-the-box ideas, brainstorm around a variety of themes, and simply generate multiple versions of your image.
How Adobe Photoshop Generative Fill Works
Generative fill follows a minimal workflow. With only a few steps, you can apply Photoshop’s generative fill in your image or photo.
Firstly, Select the Preferred Area or Object in Your Image
Make use of any selection tool available in Photoshop to pick the specific part of your image you want to work with.
Then, Access the Generative Fill
Find and hit the Generative Fill button in the contextual taskbar that shows up or go to the Window menu > Contextual Task Bar > Generative Fill.
Render your Text Prompt
Pinpoint the object or scene you intend to generate in English. You can also leave this box blank, letting Photoshop fill the selection based on the surrounding context.
Generate variations of your Image
A new Generative Layer will be created in the Layers panel, giving you access to the Properties panel where you can view your text prompt, mask, and variations.
This allows you to explore umpteen creative possibilities and easily revert back to the original image without impacting it. Thumbnail previews of the generated variations based on your prompt will show up in the Properties Panel or the Generative Fill dialog box.
Generate Additional Variations
To generate further variations, hit the Generate button again in the Properties panel. You can also tweak your text prompt in the prompt box and click Generate to create new variations based on the revised text.
In the Properties panel, you can spot the variations and click on the thumbnail previews to view the results on your image.
Pros and Cons
Similar to any other technology, Photoshop’s generative AI tools come with their own set of pros and cons. Let’s have a closer look at them:
Pros:
- Automate repetitive tasks, saving precious time and effort.
- Integrate seamlessly with the existing features, letting users fuse traditional editing techniques with the power of AI.
- Inspire users to explore new artistic directions by giving fresh perspectives and innovative options.
- Pushes the boundaries of imagination by letting multiple artists add their unique touch to a single artwork and generate their creative images.
Cons:
- Heavy reliance on algorithms that may produce unexpected or undesired results occasionally.
- A hurdle for beginners as they will be prone to using AI features, brushing aside the fundamentals of editing and enhancing techniques.
- Pose a threat for the misuse of original images and also take away original artists’ due credits.
How to Use Generative AI Tools in Photoshop
Leveraging the generative AI tools is a piece of cake. You don’t have to be a Photoshop expert to reap the fruits of this AI feature. Let’s take a look at the general process of using generative AI tools in Photoshop:
Get Acquainted: Start by getting familiar with Photoshop’s scores of generative AI tools, including the Generative Fill tool.
Get Your Image Ready: Open your preferred image in Photoshop and decide the areas where you want to apply generative AI techniques.
Proceed to Select the tool: Activate the Generative Fill tool from the toolbar and make sure to adjust the settings as per your desired outcome.
Employ the technique: Leverage the Generative Fill tool to fill gaps, remove objects, or experiment with new visual effects. Don’t forget to iterate and fine-tune your results as necessary.
Merge with Conventional techniques: Generative AI tools work best when used with traditional editing techniques. So, consider experimenting with layering, blending modes, and other Photoshop features to attain striking results.
Don’t Forget to Save and share your creations: Once you are glad with the outcome, save your images and share these creative pieces with others.
Perks and Benefits of Photoshop Generative Fill
AI tools have opened up opportunities and possibilities in various realms. Photoshop is one of the tools that have incorporated AI features to simplify and spice up compositions, designs, art, etc.
If you are a photographer, photo enhancer, or creative thinker, the generative fill feature can do wonders for your photography masterpieces.
Convert abstract ideas into enthralling images
You have a superexcellent idea for your project or business. But it’s difficult to present abstractly. No worries! With the generative fill tool of Photoshop, you can transform the idea into a visual that can present and deliver the message optimally.
Generate creative and captivating imagery
Not just for ideation, generative fill can be handy for creating random but creative images too. If you already have photographs, you can input text prompts for them in Photoshop and it will bring out imposing and innovative photographs in return.
Produce one-of-a-kind compositions with high productivity
The best part of the generative fill feature is that it creates unique and appealing compositions in a matter of seconds. This allows you to focus on additional tasks and boost your productivity.
Enjoy limitless creativity with Photoshop’s control
The generative fill integrates seamlessly with Photoshop and merges bottomless creativity with the precise control provided by Photoshop’s interface.
The newly created material is stored in Photoshop’s separate generative layer letting you explore several creative possibilities while maintaining the original image.
Tap into Adobe Firefly which powers the generative fill
Adobe Firefly, a set of generative AI models powers the generative fill. It’s predominantly built for commercial usage. The upside of the AI model is it guarantees content creation that doesn’t violate any intellectual property right and complies with quality standards.
3 Cool Examples of the Generative Fill Tool
Many global brands have already commenced leveraging the game-changing generative fill feature of Adobe Photoshop. The good thing is that the use of this AI feature has also heightened their presence on various platforms.
Nike Ad Powered by the Generative Fill
Nike has taken full advantage of Photoshop’s generative fill. The integration of AI algorithms lets designers create striking visuals that blow away viewers. The AI-enabled Photoshop amplifies the creative workflow, allowing for quicker and more efficient design iterations.
Generative Fill Extends Images to Build a Scene
The spectacular timelapse showcases the power of Photoshop’s generative fill feature for extending images and then building a scene. The artist deploys blank prompts and allows the AI to display options for extending the current selection.
With the exploration of different aspect ratios and adding music, a dynamic and visually appealing sequence is created.
AI Unravels Hidden Mysteries
The abilities of AI extend beyond image enhancement. The example shows Photoshop’s AI-powered features are employed to demystify mysteries. By analyzing and enhancing historical photographs, previously hidden details are disclosed.
The image-enhancing and restoring ability of AI algorithms opens new ways for researchers, historians, and archeologists.
It’s a Wrap Up
Photoshop has brought tons of updates since its first release. With every update, it brings something new and exciting. After the emergence of artificial intelligence, it has introduced a whole lot of AI features, each one with its unique specialty.
Adobe Photoshop Generative Fill is one of the exciting features of Photoshop’s AI arsenal. It has given Photoshop users, regardless of their professions, a new dimension to come up with creative and fascinating compositions. They can also tinker around a single image with different variations to decide their final pick.


