How to Create Mist in Photoshop: Step by Step Tutorial

Before we show you how to create mist in Photoshop, let’s understand what mist is. When we get up early in the morning during the winter season, we often see the atmosphere fuzzy, right? This is because of the merging of tiny water droplets in the atmosphere forming clouds at that particular time. This is nothing but mist in the atmosphere.
You may be wondering if it’s a mist, what fog is then. Well, fog and mist are pretty similar but they differ mainly in density.
Fog appears to be a collection of thick clouds while mist appears as thinner. It feels great when we walk outside on a misty morning along with a cold breeze.
How to Create Mist in Photoshop [Easy Steps]
If you are a graphic designer or a photo editor, you are likely to get projects where you have to create misty effects in cloudy morning images. Whether you are a beginner or an expert, taking advantage of tutorials would be a great deal for you.
We will walk you through the step-by-step process of creating a mist in Photoshop.
Let’s get started…
1. Open an Image and Duplicate the Layer
In some instances, choosing the right photograph can really do wonders. So, in order to achieve a better result, we chose a photograph that would fit the mist effect.
To begin, open the image in Adobe Photoshop by pressing CTRL+O.
Layer duplication is as simple as it always is. There are several ways to duplicate a layer, but the quickest one is to use the keyboard shortcut CTRL+J.
However, in this case, we duplicated the layer by navigating to Layer> Duplicate Layer.

2. Removing the Background
The latest version of photoshop makes it easier to remove an object from an image. Such as removing the background apart from the photo.
To do so, select the object and create a mask over the layer.
However, if you're using a current version of Photoshop, you can use AI (Artificial Intelligence) to remove the image background automatically from the properties area.
But you don't need to be worried if your photo contains fur or hair. There are multiple ways to remove background from an image that appears to be difficult to remove.
And it becomes more complex depending on the image you're working on. But once you get the hang of it, you can do that easily.

3. Gradient Effect and Resizing
One of the most fascinating approaches for making an element look more imaginative and colorful is the gradient effect. So, in this example, we're using a gradient white linear effect with an adjustment layer to cover the background layer.
And you can easily create a gradient by simply selecting the background layer and clicking on the adjustment layer underneath. When you select gradient, you'll see a pop-up box similar to the one shown below.
You may customize the properties, and click on OK.

4. Overhauling The Object
In this step, we'll focus on the image to make it look more natural. We're not working on color correction as we didn't change the original background. But you can always feel free to play with your ideas.
To keep things simple, we're only modifying the hair edge with the brush tool and choosing the foreground and background colors, white and black.
After that, rub over the edge of the hair to make the background more visible.

5. Use of Render Filters
Now, we've come so far to the main part of this tutorial. It's creating the cloud pattern.
To do that, you need to create a new layer. And select the layer and navigate to Filter> Render> Clouds

6. Making the Cloud Patterns Look Natural
You've finally made the cloud. Now, simply select the Screen blending mode to give it a more natural appearance.
After that, use the keyboard shortcut (CTRL+ALT+SHIFT+E) to merge all of the layers underneath and move it to the top.
Select the merged layer once more and change the blending mode to Multiply.

7. Last Step
You can leave it there if you're satisfied with the preceding result. However, to achieve a great and natural effect, use the adjustment layer and pick Vibrance for a little color correction. And that's all there is to creating mist in Photoshop.
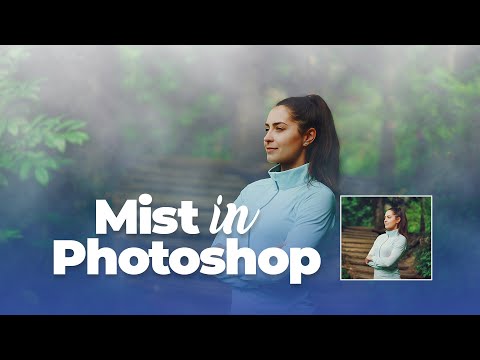
Final Output


Finally, mist is created on the air and it looks super realistic in the atmosphere giving a vibe of a misty and foggy morning.
Video Tutorial
You may also read- How to Blend Colors in Photoshop?
That’s all we had in this tutorial for you. Hopefully, you found the tutorial easy-peasy and beneficial. Until we come up with another informative tutorial, stay connected to us!!!
Suggested Article

20 Creative Photoshop Ideas for Beginners to Try in 2023