Ultimate Guide to Striking Construction Photography

Construction photography tells stories through images of sites, machinery, and the workers who operate them. It captures everything from tall skyscrapers to small home renovations. These photos show progress and highlight craftsmanship.
Good construction photography helps businesses market their work. It also maintains detailed records and provides audiences with an exciting behind-the-scenes view.
Stunning construction photos create valuable opportunities. This is especially true for photographers, builders, or architects who want to showcase their work.
This guide covers all you need. It includes equipment, camera settings, creative tips, and safety essentials. Use these to capture images that stand out. Well! You may also go through our previous article, where we focused on industrial photography.
Essential Equipment for Construction Photography
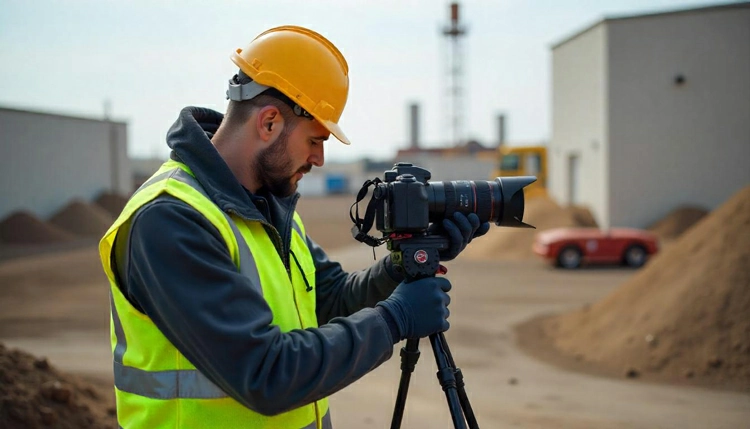
Get great construction photos with the basics. A few essentials make a big difference. Get a good camera with interchangeable lenses, like a DSLR or mirrorless. A 24-70mm zoom lens is a good choice.
Bring a sturdy tripod along. Construction sites can be pretty shaky. This thing helps you capture sharp, clear photos – even if your hands are a bit unsteady or the lighting isn’t great.
If you work outdoors, grab some protective gear. A sturdy camera bag that can handle the elements will keep your gear safe from dust, dirt, and moisture.
Wear personal safety gear too – think hard hat, reflective vest, steel-toed boots, and gloves. You’ll need this stuff when you’re around heavy equipment and busy construction areas.
Lastly, toss in some spare batteries and extra memory cards. Don’t expect to find many charging spots at construction sites. You’d hate to miss that perfect shot because you ran out of power or storage space.
Camera Settings & Techniques for Stunning Shots
Take great construction photos by understanding your camera’s settings and following these helpful tips to improve quality right away.
- Sharpness (Aperture): Try setting your camera between f/8 and f/11. This range gives you crisp, sharp details from one end of the image to the other.
- Action Shots (Shutter Speed): For clear shots of moving workers or machines, go for a shutter speed of 1/500 sec or faster.
- Clear Images (ISO): Use ISO 100 to 400 for the cleanest images. This helps you steer clear of grainy effects.
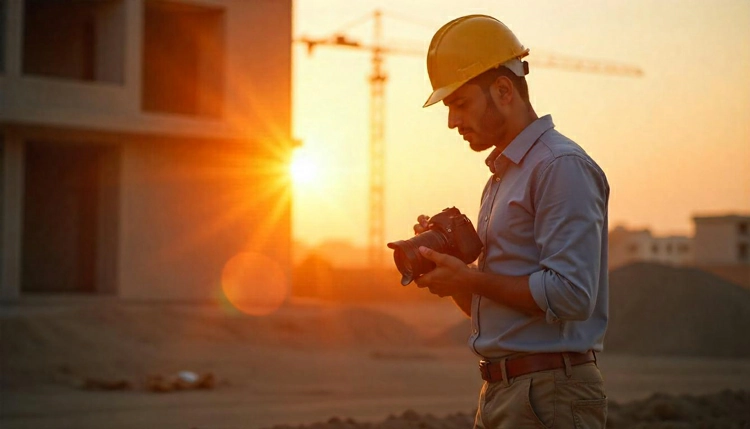
- Get the Light Right: Take photos during the golden hour – early morning or late afternoon – for great colors and eye-catching shots.
- Composition 101: Experiment with lines, angles, and the rule of thirds to balance your photos and make them more interesting.
- Capturing Action: Try a slower shutter speed, such as 1/30 sec, to blur the motion and add life to your images.
- Natural Colors (White Balance): Set your camera’s white balance to fit the lighting. This keeps colors looking true and attractive.
Composition and Perspective
In construction photography, framing is everything. It’s just as important as the subject itself. Good composition and unique angles show the whole story of a project. They reveal what’s being built and why it’s significant.
Think big when considering scale. Construction sites are large and chaotic. Use wide-angle lenses to capture the entire scene, especially for big projects like bridges or skyscrapers. Include people, vehicles, or equipment in your shots. This will show just how large things are and add depth to your photos.
Lines and angles are essential photography tools. Look for features like steel beams, scaffolding, and staircases that create lines leading the viewer’s eye. These features guide the eye through the photo, often to the main subject.
Shooting from low down makes buildings look bigger. High-angle shots from above show patterns you might miss from the ground.
Add some depth to your composition by using layers. Put something right up front. Next, think about the middle area and the background too. This layering adds a lot of dimension and helps draw the viewer in.
Don’t just shoot from eye level. That can lead to boring photos. Try different angles. Walk around, crouch down, or climb up. Find the viewpoint that works best. A small change in position can make a big difference. It can turn a photo into something powerful.
Working with Natural and Artificial Lighting
Lighting transforms construction photos from mundane to magnificent. Mastering both natural and artificial illuminations lets you capture vibrant scenes that pack a punch.
Golden hours are your golden ticket to stunning site photography. That soft sunlight dances across textures, bringing out the character in concrete, steel, and wood.
Conquer midday challenges by tackling harsh shadows and washed-out highlights. Adjust your exposure settings to find harmony or seek the shade. With the sun at your back, you can banish lens flare and let shadows weave depth into your composition.
Boost brightness in dim areas with extra light. Adjust white balance for true colors. Pack a portable light or flash for shadows.
Balance is key when mixing natural and artificial light in one shot. Each has its own color tone, and if they don’t match, your photos can look off or confusing to the camera.
Stay adaptable and aware of how light dances across the site. It enhances texture, creates moods, and turns ordinary shots into masterpieces.
Documenting Progress: Capturing Timelapse Photography
Timelapse photography transforms a construction project’s lengthy saga into mere minutes. It’s a compelling way to showcase milestones, dazzle stakeholders, and create striking marketing gems.
Anchor your camera on a sturdy ledge, granting a sweeping vista of the site. Elevate it to the heights to banish any view-blocking intruders.
Use a timelapse camera to take pictures at set intervals. You can choose every few seconds, minutes, or hours to match the project’s pace.
Take charge of your lighting changes with grace and precision. External power sources and roomy memory cards keep your extended shoots seamless. A cloud-connected camera is a vital ally in your creative toolkit.
After your creative session, let video editing enhance your shots. Add a soundtrack, include text, and use voice-overs to highlight memorable moments.
Timelapse photography is where technique meets artistry, creating magic. When executed brilliantly, it morphs effort and change into a breathtaking visual odyssey, inspiring and captivating all who gaze.
Human Element: Photographing Construction Workers
Infusing your construction photography with people breathes life into every frame. While buildings and machinery stand tall, it’s the workers who tell the true tale.
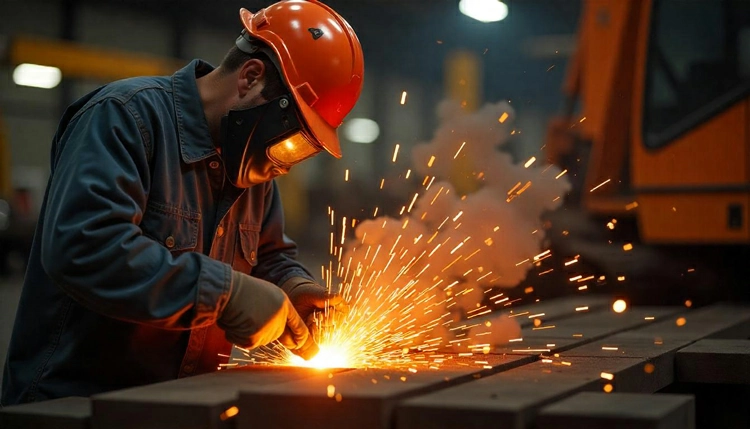
Capture real moments: a welder immersed in fire, a team lifting steel, or a supervisor leading with confidence. Candid shots unveil their skill and camaraderie.
Zoom in, but keep your distance; authenticity thrives in the moment. Each facial expression, every gesture, and body language detail adds rich layers to your shots.
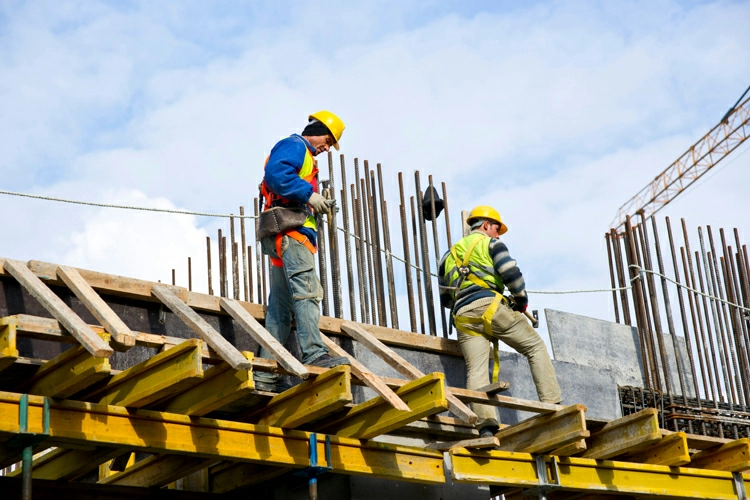
Secure permission for close-up shots when faces are visible. Always obtain a model release form for commercial use. Including people in construction photos effectively conveys scale.
A person standing next to a towering crane or massive structure emphasizes its enormity. This reminds viewers that people, not just machines, bring projects to life.
Safety is key. Always be cautious and steer clear of risky situations. Keep a safe distance from dangerous areas. Follow site rules and wear required safety gear at all times.
Safety and Permissions on Construction Sites
On a construction site, you’ll find heavy machinery, uneven ground, and many people. To stay safe, wear essential gear: hard hats, steel-toed boots, reflective vests, and gloves or safety glasses.
Get permission from the site manager or project owner before entering the site. They need to know who’s on-site and why – liability risks are a serious concern.
Sites limit photography for confidential designs, branding, or workers who don’t want to be photographed. So, respect these rules. Also, obtain a release form from any identifiable workers in your photos.
Avoid active work zones unless invited or instructed. Keep a safe distance from equipment, walkways, and distractions. Otherwise, it may cause accidents.
Professionalism and respect are essential for safety. This approach builds trust, ensuring smoother shoots in the future. When safety comes first, photography excels, delivering excellent results without compromising anyone’s interests.
Post-Processing and Editing Tips
Unlock the full potential of your construction photos with these savvy editing tips:
- Illuminate the Scene: Illuminate shadows and highlights to craft a harmonious glow.
- Make Textures Sing: Highlight steel, concrete, and wood for tantalizing depth and detail.
- Reveal Radiant Colors: Infuse vibrant hues while keeping them refreshingly natural.
- Light the Way: Harmonize natural and artificial light for authentic color tones.
- Align Your Angles: Straighten tilted horizons and leaning structures with a crop and rotate.
- Clear the Clutter: Banish distractions like trash, wires, or unwelcome visitors in the shot.
- Stay True to Life: Keep the scene’s authenticity intact; avoid overzealous edits that mislead.
- Leverage Presets: Speed up your workflow with presets, refining each image for perfection.
Wrapping Up
Construction photography shows how a building is made and grows over time. Each photo highlights the hard-working people turning building plans into reality. Good tools, proper lighting, and smart methods help tell the story.
Every frame tells a story, revealing the hustle behind the towering structures. Make safety your top priority, plan shots carefully, and edit with care. This turns ordinary scenes into amazing visuals.
FAQs
1. What camera is best for construction photography?
You can choose a DSLR or mirrorless camera to capture construction. They offer manual controls and interchangeable lenses for creative shots.
2. Is it necessary to take permission to shoot at a construction site?
Before entering a construction site, get approval from the site manager or project owner. Then, follow all safety regulations and legal guidelines.
3. What’s the best time to take construction photos?
Take construction photos in early morning or late afternoon for soft shadows and vibrant colors.
4. Is a drone allowed for construction photography?
Drones take construction photography to new heights. They capture unique angles easily, but follow local regulations.
5. How do I keep my photos safe?
Protect your photos like jewels! Pack extra memory cards and back them up.


