How to Create a Realistic Spotlight Effect in Photoshop

A spotlight is an effective way to draw the attention of the viewers to a subject. Spotlights are widely used in concerts, theaters, and different kinds of TV shows. In this tutorial, we will show how to create a realistic spotlight effect in Photoshop using filters.
Creating a Realistic Spotlight Effect Using Photoshop Lighting Effects
Adobe Photoshop makes it easier to work with lighting in the context of an image. So, we're going to use the lighting effects filter in Photoshop to make an image spotlight effect. Let's begin.
Step 1: Open the Image

Press CTRL+O on Windows or Command+O on Mac to open an image. This is will bring a dialog box from where you can choose your preferred image.
Step 2: Add Lighting Effects Filter

Adding lighting effects in Photoshop is so easy and simple. To do that, go to Filter> Render> Lighting Effects to enable the effect. After that, you'll get full control over the lighting on your photo. And it set the default effect to "Spot Light".
This allows you to apply texture while also adjusting the photo's lighting, color, exposure, gloss, and metallic effects, among other things.
Step 3: Adjust the Lighting Area

The most important step is to alter the lighting area. You can get the optimal results if you have a basic understanding of lighting direction. Playing with the circle points, on the other hand, gives the sense of adjusting the lighting based on the image.
After you're done with this, you can proceed to the next stage.
Step 4: Final Step

If you want to add some flair to your project, you can do so by choosing a color from the properties. However, picking the appropriate color might be tricky.
So, if you think your photo doesn't need additional color, then you're okay with that. Otherwise, choose a color that complements the photograph. Based on the visual context, we picked the red hue to emphasize passion and energy.
Before and After


2nd Method to Add Spotlight Effect in Photoshop
You are probably looking for another way to add a spotlight effect, right? We'll show you how to do it in Photoshop, so you can easily apply it to your next project and bring something new to the table.
Step 1: Create a Solid Color Layer and Select Black

Open the image that you want to create a spotlight on in Photoshop.
From the new fill or adjustment layer create a solid color layer and select black from the color picker.

Step 2: Decrease the Opacity of the Layer and Create a Selection
From the layers panel, decrease the opacity of the solid color layer.

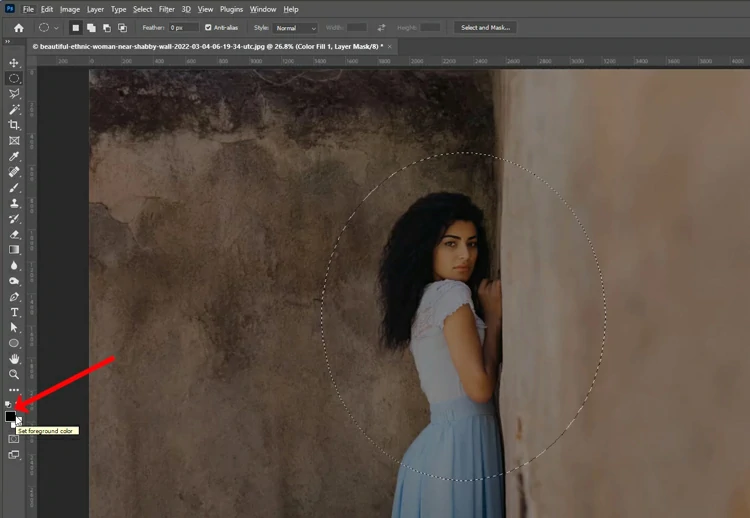
Next, create a selection with the elliptical marquee tool.

Now select the foreground color as black from the toolbar.
Also, select the mask from the layers panel and press “Alt + Del” to fill the mask with black.

Suggested Article

20 Creative and Easy Photoshop Ideas for Beginners in 2023
Step 3: Reverse the Opacity Back to 100% and Apply Gaussian Blur

From the layers panel, reverse the opacity back to 100%. Now you can apply the filter to soften the blur. Go to the Filter>Blur> Gaussian Blur from the top menu bar to apply Gaussian Blur.


Or better if you are using Photoshop CS6 or higher, you can apply Feather from the properties panel. Double-clicking on the layer mask icon will open up the properties panel. You can drag the slider to choose a feather amount. This is the best method as the settings can be changed at any time.
Step 4: Adjust the layer Mask With Free Transform
Unlink the layer mask by clicking the icon in the middle.

Select layer mask from the layers panel by clicking on the icon. Then either press Ctrl + T on the keyboard or go to Edit> Free Transform.

Right-click on the free transform box to apply distort.

Now adjust the spotlight in the direction of the light source by clicking and dragging on the box.

Step 5: Select the Brush Tool to Paint on the Mask

Right now the spotlight effect should be looking pretty good. However, it is possible to remove the spotlight from the areas where the shadow is expected.

To remove the spotlight from some areas and apply a shade opposite to light source, you can do the following-
(a) select the brush tool from the toolbar
(b) set the foreground color to White
(c) change the opacity to a lower level
(d) paint and adjust around the areas where you do not want highlights to be visible
Step 6: Got the Spotlight!

And, finally, we have got our desired result, a soft spotlight around the women. You can compare this with the initial image to see the effect.
Again, if you want to tone down the effects a little, you can reduce the opacity of the adjustment layer. This technique can be applied to any kind of photo including people and other objects.
Video Tutorial:
You may also read: How to create mist in Photoshop: step by step tutorial
Conclusion
We have shared a simple way how to create a realistic spotlight effect in Photoshop. There are many different ways to do so. We have picked out the less complicated one so that it gets easier for you to understand. Hope you enjoyed the tutorial. Happy learning!