How to Change Hair Color in Photoshop- Tutorial
Why do you need to change your hair color? Well, there may be plenty of reasons behind it. You may wish to spice up your model’s shot for your upcoming ad. Additionally, you may even urge to see yourself with a different hair color than your original hair color, right? And then to make it happen, you take a portrait shot with your smartphone to apply filters. With filters, your hair color does change but most often with a loss of quality.
So, what’s the solution to this problem? It’s none other than Photoshop!!! Yeah, you rightly heard, it’s Photoshop. Leveraging Photoshop, you can manually modify your hair color without any distortion or loss of quality. There are a host of techniques you can deploy to change your hair color in Photoshop.
How to Professionally Change Hair Color in Photoshop
Here, in this tutorial, we will walk you through the easiest and simplest technique to change your hair color. With a few clicks of your mouse, you can transform your hair color into a different but realistic one. The good thing about this method is that you are in complete control of the entire editing process.
Without further ado, let’s jump into the step-by-step guide………
Open your Image in Photoshop and Duplicate the Background Layer

First of all, open your image in Photoshop and duplicate the Background Layer. To duplicate, right-click on the Background Layer and select “Duplicate Layer” or press Ctrl + J to apply the keyboard shortcut.
Select the Brush Tool and Enable the Quick Mask Mode

Now, select the Brush tool and also enable the Quick Mask mode from the bottom of the toolbar.
Select the Hard Round Brush Tool

Select the hard round brush tool as shown in the screenshot below. Adjust the brush size and hardness to achieve perfection in quick masking.
Paint and Mask the Hair

Now, start painting over the hair gradually to mask the entire bunch of hair. Tweak the brush size when necessary and paint smoothly. Fly-away hairs need to be brushed with a lot of care as it’s pretty difficult to paint them with precision. Once the painting is done, the hair is masked.
Enable the Standard Mode
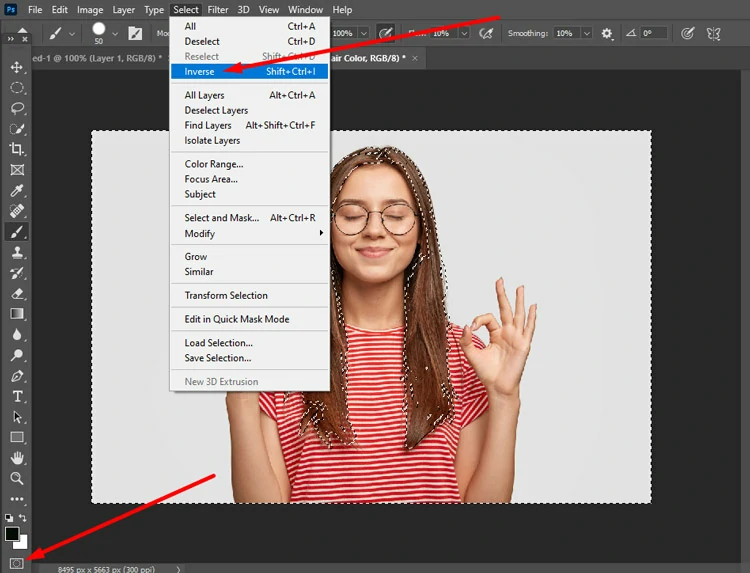
Now, enable the standard mode from the Quick Mask mode from the bottom of the toolbar to view the selection. Then, go to the menu bar, click the Select tab and then select Inverse to reverse the selection.
Select Solid Color from the New Fill Layer
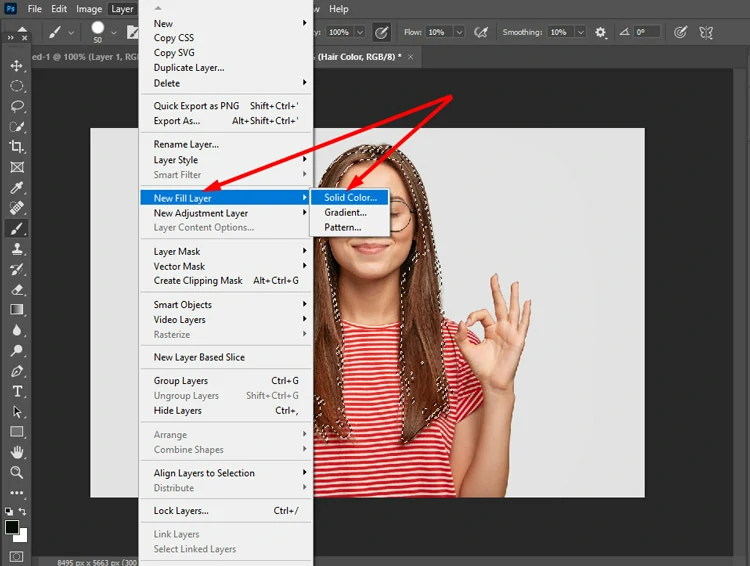
Go to the menu bar again and click the Layer tab. From the drop-down menu, click the “New Fill Layer” and select “Solid Color”.
Select Soft Light from the Mode

This will open up a “New Layer” dialog box. Click the drop-down from the Mode on the dialog box and select “Soft Light”.
Choose your Preferred Color

This will open up a dialog box with a color picker. Choose your desired hair color from the color picker and hit the Ok button.
You may also read- Color Theory.
Final Output

Finally, you are done with changing the hair color in a pretty simple and easy way. The final output in the screenshot below shows a realistic hair color change.
Ending Lines…
So, that’s all we have for you in this tutorial. Hope you enjoyed the tutorial and found it an easy-peasy method for changing the hair color. In this way, you can change the color of any type of hair no matter whether it’s black, brown, white, grey, blonde, etc.
To get updates about our upcoming tutorials, stay connected to us by following our Facebook, Twitter, and LinkedIn pages. You can also visit our website to know more about us and our services.


