How to Resize a Layer in Photoshop : Tutorial for Beginners

If you want to work in Photoshop, you must fathom the concept of layers. Layer is an essential part of Photoshop and without having a clear idea about it, you are likely to goof up your Photoshop edits. In this tutorial, we will basically touch on how to resize a layer in Photoshop. But before that, we would like to throw light on the fundamentals of layers.
When you open an image in Photoshop, it contains several elements, right? Now, if you start editing a part of the image straightaway without creating a new layer, it will distort and spoil your original image. This is where a layer comes into play as by creating a new layer, you can separately work on that part without affecting the original image.
But why resize a layer? Well, if you wish to make a composite image, add text to a picture, or alter any element of an image, you need to know the process of resizing a layer. This is because the size of different images or elements isn’t identical. Hence, you have to tinker around the size of these images or elements to fit them into a specific layer which is destructive. Alternatively, you can resize that layer as per your need and easily fit your images and elements non-destructively.
How to Resize a Layer in Photoshop (Simple Steps)
Now, let’s take a quick look at the process of resizing a layer in Photoshop. It’s a simple and quick process. Even if you are new to Photoshop, it should be a cakewalk for you to understand the steps.
Let’s get started….
1. Open an Image in Photoshop

At the very beginning, choose a clear and crisp image to create a layer.
2. Convert the Image Into a Smart Object

The first thing you should do after opening your image is- convert your image layer into a smart object. This will let you do non-destructive editing to the layer afterward as it stores all the source content of your image maintaining all the original characteristics.
3. Select the Free Transform Command
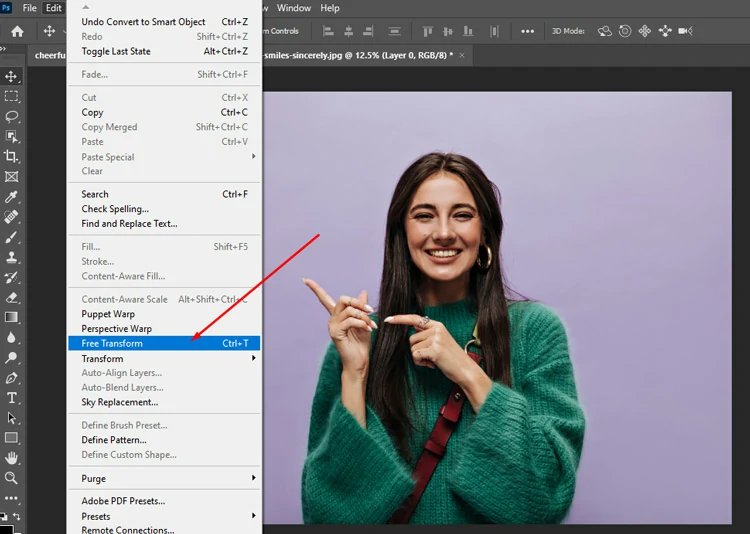
Make sure you are using the “Move Tool.” Now select the Free Transform tool in Photoshop to resize the layer. For that, go to Edit in the menu bar and then select the Free Transform command.
Edit > Free Transform
4. Adjust the Layer Size

You will notice a resize bar popping up with several anchor points on corners and sides. All you have to do is drag and drop the layer selecting the anchor points or image handles. To retain the height and width perfectly, hold the Shift key while dragging the layer.
5. Finalize the New Layer

After you finalize the new layer size to your contentment, just click the checkmark located on the right side of the options bar or simply press the Enter key for Windows and Return key for macOS. To increase the layer size, drag away from the center and to decrease the layer size, drag toward the center.
6. Layer Transformation in Progress

Immediately after that, layer transformation will start which will take a bit of time. From the dialog box below, you can notice the progress of the layer transformation.
7. Final Output

Finally, the layer is reduced and resized. From the screenshot below, you can see the image position has transformed to a great extent. The transparent area in the canvas denotes the absence of pixels which was previously filled with pixels.
To Conclude
This is it!!! It’s too simple and easy, right? In this way, you can modify the size of your layer and do your complex edits pretty easily. But don’t forget to focus on the proportion of the layer length and width as an imperfect proportion of the dimension can downgrade the image’s appearance.
Don’t forget to visit our website and social media pages to know about our services and get all the latest updates. Until we come up with another thrilling Photoshop tutorial, stay happy, safe, and pumped up.


