[Lightroom Tutorial] Restoring Old and Damaged Photos

Adobe Photoshop Lightroom is a photo processor and organizer. It a very handy tool for viewing, organizing, and retouching a large number of photos in short time. Though it’s associated with Photoshop, yet it has some limitations. But, when you want quick service using less PC memory, Lightroom is the go to tool.
Lightroom usually works with color, tones, and highlights. Usually, Lightroom is thought to be a Photo Color Correction tool, but it has many other features to enhance photos. It has a tremendous capability to make a photo black and white from color or vice-versa. It can restore torn & scratched old photo, faded photo, vintage photos, remove and optimize shadows, correct exposures, etc. You also can use Lightroom for removing red eyes, blemishes, dust, spot, unwanted background objects, fuzzy photos, remove unwanted objects, and many more.
Don’t rely on boasts online try us free, and judge yourself.
Lightroom can be used to restore any old photos and can fix color related defects in your photos. You can also do some retouching works. Let’s see what you can do with Lightroom:
Torn, Dusted, and Scratched Vintage Photo Restoration
You can deal with torn and scratched old or new photos in Lightroom. Following the steps below, you can restore your photo to more modern look.
1. Firstly, you have to import a photo. Here, I have imported the photo in the library of Lightroom in the same way like the first one.

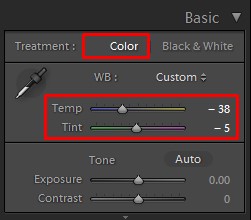
2. Go to Develop and the first thing you have to do is white balance.
3. So, click on Color, reduce Temp and Tint as needed.
4. Change the Contrast, Highlight, Blacks, Clarity, and Vibrance property to get more accuracy.

5. Go to Hue panel and change the slide’s property as you need.

6. Finally, go to Luminance and Split Toning. Change the value, but be careful of your photo if it goes over colored.


7. Now, it is time to retouch to remove blemishes and scratches.
8. Take Graduated Adjustment tool and manage it carefully for retouching.

9. Use Heal brush from Spot Removal (Q). It works almost as like the Clone Tool of Photoshop. Keep opacity 100% and click on the good portion of the photo and drag on the spot or scratch area.

10. Thus, you can get your desired photo as I have got.

Fuzzy & Tint Photo Restoration
This type photo restoration is very easy in Lightroom. It is just a matter of one click. So, let’s do it.
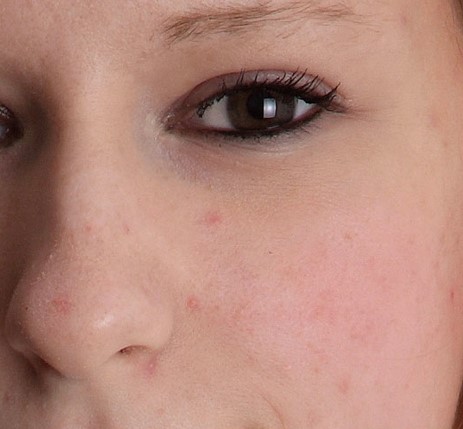
1. Open the image in Lightroom that you like to beautify. I’m working on this photo that is fuzzy and looking a little bit older.

2. Take or select any neutral color from the image. It may be gray color or black hair.
3. Select the Eye-dropper from the Basic white balance

4. Click anywhere on the photo and see the magic. It will make your photo enlightened removing shadow, fuzzy, and tint.
5. You can change the value of Clarity, Vibrance, Saturation, etc. for more accuracy.
6. Anyway, the result of my selected photo is:

7. Ok, that’s all about this photo.
Shadow removing
Open your image in this software to remove the shadow you don’t want. I’m opening this image and showing how to restore photo from bad shadow.

Look at the picture, there are bad shadows on the arm and face. Now, we’ll try to remove the shadow
1. At the very first, go to Adjustment Brush. Click on the Color and select the Burn (Darken) from the dropdown.

2. Reduce the exposure level and click on the light color and drag the brush on the photo to make the shadow light.
3. Click on the New Option. Then, Select the Exposure from the dropdown and increase the exposure as needed.
4. Click on the Light area and drag on the whole image where the dark area remains to remove the shadow.

5. Apply Graduated Filter (M) as your image needs.
6. Thus, you can get the best appearance of your photo.
7. See the result I tried:

Removing Red Eye
Now, we will work on the red eye and remove it to restore the original color of the eyes.
1. Import an image of red eye in the Lightroom like this:

2. Select the Red Eye Correction tool from the toolbar.
3. Drag it to the center of the eyeball just around the red portion.
4. As a result, the eye will be black. Now, increase or decrease the Pupil size and the Darken level to get the desired color.
5. In this way, you can get perfect eye color like this:

Removing Dust / Spots / Fuzzy
It is an important work for making an image pop. It increases the beauty of a photo. Let’s do spot removing task in Lightroom. I’m using a baby picture like this:
1. Import an image in Lightroom you like to remove spots from.
2. Select the Spot Removal (Q) tool and apply it on the photo.

2. Resize the brush size by pressing Left or Right Bracket from the keyboard.
3. Click on the spot and magically it will create circle & remove the spots.
4. To hide or to see the circle press H from the keyboard. You can resize the circle by dragging from the circle line.
5. Change the feather and opacity level as you need.
6. However, in this way you can get the original appearance.

Removing Background Objects
Removing unwanted background objects of a photo in Lightroom is very easy. It is same as the spot removing work.
1. At first, open the photo in Lightroom.

2. Click on the Spot Removing
3. Resize it, increase or decrease the Feather and Opacity
4. Click on the objects you want to remove.
5. Thus, you will get the desired photo without the disturbing objects.

Create Color Photo to Dramatic Black & White Photo
This is a very popular work in Lightroom. If you want to make your photo dramatic black and white, you can do so by following few simple steps.
1. Open Lightroom and move to the Library.
2. Go to File from the left-top and click on the Import Photo and Video (Ctrl + Shift + I). I have taken this image for this tutorial:

3. You can see the imported photo in the library. Go to Develop.
4. Here, you can see your photo. On the right side, there are available Histogram and Basic palate just below the histogram. Now, head over the Basic Palate.

5. You can make the photo black and white by two ways. One is that just click on the Black & White button, and the two is reducing the Saturation up to -100.


6. You can see now your photo is black and white. For getting a better look, you have to do few retouching works.
7. Change Black and white slides’ property as needed to make the photo whiter and blacker.

8. Go to Adjustment Brush (K) and change Exposure or other Slides as you need.
9. However, this is the result that I got.

10. Thus, you can get your stunning black and white photo.
By the way, by using Lightroom you can get back your old and even new damaged photos can be restored. You can make free your photos from spots, unwanted objects, shadows, scratches, and so on. It has a lot of tools and options to correct light and exposure. The usage of these tools and options is very easy. So, anyone can easily try it to make their stunning images.