6 Quick Steps to Remove Image Background Using Gimp
Removing image background is pretty much easy in Photoshop. You might do it, but have you ever tried with other software? You might do or not. If you wanna experience the same task in a different image editing tool like GIMP, this content is for you. We have here shown how to remove a background from an image by applying various tools & options in GIMP.
Gimp, which stands for GNU Image Manipulation Program offers many essential tools & options that play an important role to produce professional images. As it is a community-based open-source photo editing platform, it is not so much rich as Adobe Photoshop, but yet you can have images for using business purposes in some cases. You can do almost all kinds of image editing work in this software such as background removing, image retouching, masking, etc. Anyway, now we are gonna experience of cut out photo background by applying many tools of GIMP.
Check out this content for a better understanding – GIMP vs Photoshop
Removing Background in Gimp – 6 Easy Ways
Deleting background in Gimp is so easy but you know what? There’re multiple steps you can follow to achieve your goal. So without further ado, let’s begin removing the background and making it transparent in Gimp.
1. Fuzzy Selection Tool 
The work of this tool is the same as the magic wand tool of Photoshop. In GIMP, to remove background this tool works nicely.
- For removing the image background, at first, you should open your image in GIMP. Go to File from the left corner of the top bar and click on the open & select the image file you like to work. You can open the image pressing Ctrl+O from your keyboard.


- Secondly, go to the layer of the main image and click the right button from the mouse. A new window will appear and click on the Add Alpha Channel. If you select this channel, after removing background, you will get a transparent background.

- Then, select the Fuzzy Selection Tool from the toolbar and start simply clicking on the background of the image and hit the Delete

- Thus delete the background. During removing the background, you can see some of the places, it is not being deleted. In this case, select the Eraser Tool and click on those places. You will see that the background is being removed. At last, you will get a background removed image as you desired.


- However, if you wanna replace the background color, just take a new layer in the layer palette, provide the color you like from the Bucket fill tool, and move the new layer down the main image layer.


2. Free Selection Tool 
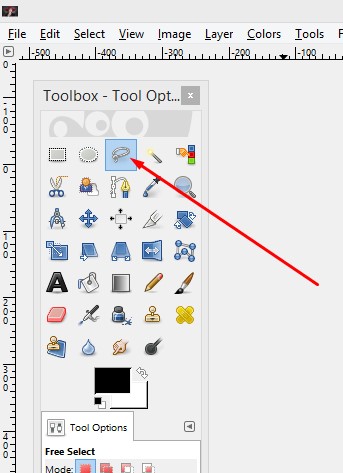
The icon and the activity of this tool is same as the Photoshop Lasso tool. Let’s now work with this tool-
- Open your image in GIMP and select the Free Selection tool for removing the background.
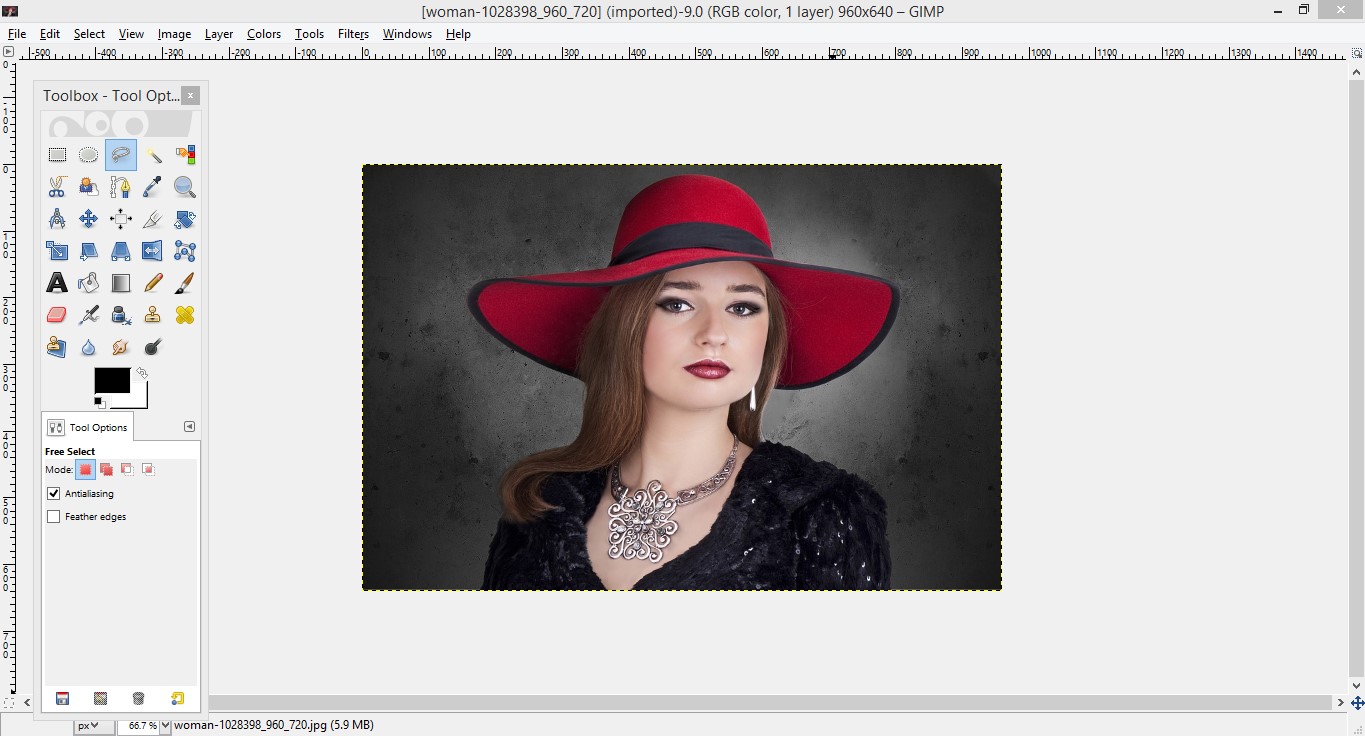
- For the working facility, zoom the image according to your need and create a selection line around the image. If you do any mistakes during creating an outline, don’t press Ctrl+Z because it won’t work here, rather press Backspace from your keyboard to undo.

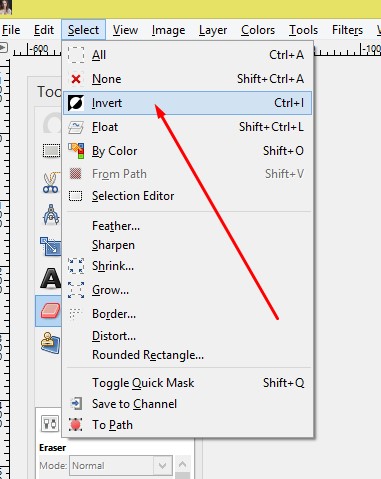
- You have selected the image so far and if you wanna select the background to remove it, go to Select from the top bar and choose Invert and click on it. You will get the image background is selected that will be visualized with the blinking dashed outline.


- Finally hit the Delete button from your keyboard to remove the background. The images below are showing the result of our experiment.


3. Quick Mask
It is another important tool to remove image background. Now, we will work with this tool.
- Firstly open your image in GIMP.

- Go to Select and click on the Toggle Quick Mask tool.

- When you click on Quick Mask, your image will get red overlay color like the image below.

- Now, select the Eraser tools and erase the red color from your main image leaving the background.


- When you have completed the work of erasing, your image will get this look.

- Now, press Shift+Q that is the shortcut key of the Quick Mask tool. Then, your image will get selected. See the image below.

- Now, go to Select and Click on the Invert to select the background.
- At this time, hit the Delete button to remove the background.

4. Layer Mask
Now, we are gonna remove the image background with the Layer Mask. Let’s do it.
- At first, take your image in GIMP.

- Secondly, click the right button from the mouse on the main image layer and select the Add Layer Mask tool. A layer mask will be added to the main layer.


- Now, take the Brush tool from the left toolbar, ensure the foreground color is black, zoom in, and drag on the image background. You can find that the background is removing.


- Carefully, drag the brush tool on the image background and remove it. In this way, you will get your image free from unwanted background.

5. Alpha Channel Mask
Now, we are gonna show you the background removing work by Alpha Channel Masking. So, let’s do it.
- At the very first open your image on which you like to work in GIMP. To fit the image in the window, go to View, click on the Zoom, and finally click on the Fit on the Window It will make your image size bigger that will help to work.


- Next, we will add alpha channel to add transparency to the image layer. For this reason, click the right button from the mouse on the main image layer and go to the Add Alpha Channel and click on it to add it in the layer.

- Then, add a duplicate layer of the image. To do so, click on the Duplicate option in the layer palette as the image is showing below.

- You have to make your image very contrast to the background color. So, go to Color from the top bar and click on the Curves. Then, move the curve line to make the image color contrast to the background color. See the image below, you can understand the fact.


- The next thing we are gonna the Color option from the top bar, click on the Desaturate to make the image black & white. You will get three options like Lightness, Luminosity, and Average. Select one that provides you the background whiter than the main image that is blacker than the background.


- Go to Color and click on the Invert to select the background image.


- Now, take the Paint brush tool, ensure the foreground color is black and drag on the background to make it black and select. If you need, make the brush size bigger pressing the Bracket ‘]’. You can zoom the image if needs.

- Next, change the foreground color white and now drag it on the main image to make it white. Your image will turn look like the image below.

- The mask is ready. Now, we are gonna add layer mask to the second layer. So, click on the second layer, press the right button, click on the Add layer mask, and make sure the mask is White with full opacity. Look at the image.


- Selecting the masked layer, go to Edit and copy it. Go to the second layer, double click on the layer mask, and press ok. Again, go to Edit and paste. Now, select the floating layer at the top and click on the Anchor to add mask.


- If you wanna change the background color, take a layer under the existing layer and provide the color you want.

6. Remove Background Path Tool
The path tool is the best tool for selecting any image or background. It is used to create a path. This tool works the same as the Photoshop pen tool. Now, we are gonna work with the path tools with a view to selecting and removing image backgrounds.
- Firstly, open your image in Gimp and select the Path tool from the tool bar.

- Zoom the image pressing ‘Z’ from the keyboard. And create a path around the image.

- While completing the path creating, make its selection. For this, click the right button on the image, go to select, and click on the From Path. Your path will be selected. You will find blinking dashed around the selection area.

- Now, your image is selected, but if you want to remove the background you have to select the background. So, invert the selection. To do that, click the right button on the selection area, go to select and then click on the Invertor you can press Ctrl+I from the keyboard. Now, your background is selected. You can see blinking dashed along the outline of the background.


5. Finally, hit the Delete button from the keyboard. Your image background will be deleted. You can change the background color taking a new layer as we described before.

That is all about background removing in GIMP. We have discussed most of the ways of removing the image background possible in this image editing tool.
Wrap-up
Gimp is capable of removing backgrounds nicely, no doubt, but if you look at the outcomes of GIMP’s tools and settings, you won’t believe it’s even close to Photoshop. The use of this tool is easy, but still, it cannot produce professional images like Photoshop. So, for getting high-quality images for business’ sake, you must take the services of Adobe Photoshop.
We have also another content about “How to Remove Image Background in Photoshop” where we have shown our experiment on the various tools and options of Photoshop used for removing the background of images. You can also try that. Anyway, if you face any problem during removing image backdrop, you can take our Free Trial service.