How to Make Videography: A Step-by-Step Guide for Aspiring Filmmakers
So, you want to make videos that grab attention? Does that actually stick? Good. You’re in the right place. Videography isn’t just about hitting record. Nope. It’s about storytelling. Mood. Movement. It’s turning moments into something people remember.
You don’t need a Hollywood budget. Not even close. But you do need the right know-how. The basics and tricks pros use without thinking.
This guide? It’s your shortcut. We’ll walk through everything—gear, lighting, sound, editing styles—from the ground up. Just real steps anyone can follow. And hey… if your first shot looks shaky? Cool. Mine did too. Progress beats perfection every time. Let’s make something worth watching.
Quick Takeaways
✔️ You don’t need expensive gear to start — A smartphone, free editing app, and good light can make pro-level video.
✔️ Lighting sets the mood — Golden hour + a $20 reflector beats a $5,000 light setup used wrong.
✔️ Audio matters more than resolution — Crisp sound builds trust. Bad audio kills even the prettiest shot.
✔️ Plan before you press record — Shot lists, storyboards, and scouting save hours in post.
✔️ Editing tells the real story — The magic isn’t just captured… It’s crafted frame by frame.
Essential Videography Equipment You Need to Start
You don’t need a high-end camera to make attention-grabbing videos. What matters most when starting out is this.
Camera: For great video quality, use entry-level DSLRs or mirrorless cameras. The Canon EOS R50 and Sony ZV-E10 are excellent choices. They shine in 4K and low light, and have smart autofocus for perfect frames.
Lenses: One lens won’t do it all unless it’s a flexible zoom like a 24-70mm. Perfect for jumping from wide scenes to tighter moments. Then add a prime. That 50mm f/1.8? Dirt cheap. Surprisingly sharp.
Stabilization: Wobbly footage? Yeah, it screams “I didn’t know what I was doing.” Avoid that. Tripod for still shots—non-negotiable. For movement, a gimbal like the DJI RS 3 Mini smooths every step, turn, and follow shot. Even handheld gets an upgrade when tech does the heavy lifting.
Audio: This is the silent killer of good videos. Built-in mics pick up everything—wind, zipper noise, distant traffic—but somehow miss the voice. Grab a lavalier mic for talking-head clips or a shotgun mic like the Rode VideoMic for general use. Clear sound = viewers who stay.
Lighting: Sunlight is free. And gorgeous. Ride that golden hour wave. But once clouds roll in or dusk hits, take control. A basic two-light kit, paired with softboxes or Amaran COB panels, works wonders. Just remember: diffuse it. Soften the edges.
Mastering Camera Settings for Professional-Looking Footage
Your camera’s auto mode deceives you. It produces bright, clean footage, but it lacks the depth and life of pro-level video. Take control to achieve a cinematic look. Here’s how:
The Exposure Triangle – ISO, Shutter Speed, Aperture.
You’ve heard this before. But let’s make it real.
– Aperture (f-stop): Controls depth of field. Want blurry backgrounds? Go low—f/1.8 to f/2.8. Shooting a landscape or group shot? Bump it up to f/8 or higher.
– Shutter Speed: Rule of thumb? Double your frame rate. Shoot at 24fps? Use 1/50th of a second. 60fps? 1/120th. Too slow = motion blur. Too fast = jittery, unnatural movement.
– ISO: Keep it low when possible. High ISO = grain (aka noise). Ugly in the video. Crank lights instead.
Now, Frame Rate.
24fps = cinematic movie feel.
30fps = standard for YouTube, web content.
60fps+ = slow motion magic. Save it for emotional moments or action shots.
And Resolution?
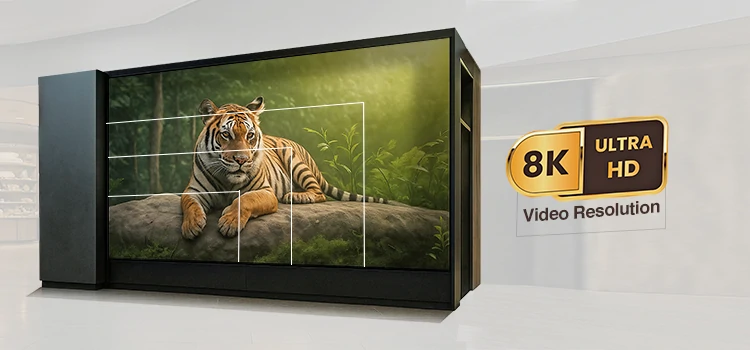
Shoot in 4K if your camera allows—even if you’re posting in 1080p. Why? Cropping. Stabilization. Future-proofing. More pixels = more flexibility in editing.
Oh—and turn on zebra stripes and focus peaking. They help you nail exposure and sharpness without guessing.
Finally, use log profiles if available (like HLG or C-Log). They flatten the image so you can color grade later. More dynamic range. More control. It feels like a lot at first… But within a week of shooting manually? It becomes second nature.
Framing the Story: Composition Techniques in Videography
Great videography comes from framing, not gear. Two people filming the same scene can have vastly different results. It’s all about composition, which turns clips into stories.
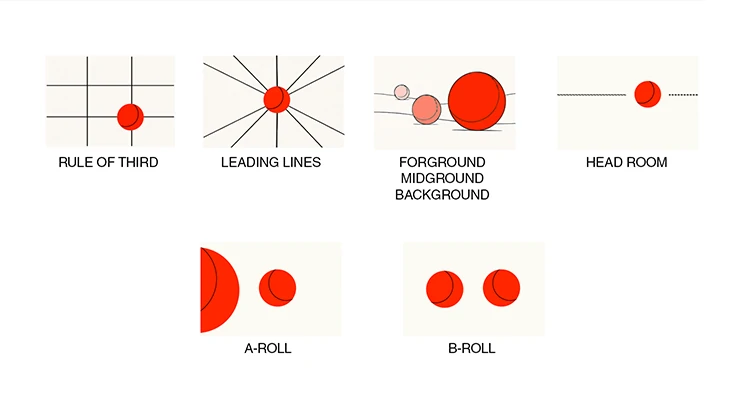
Rule of Thirds – The Golden Rule (Literally)
Turn on your grid lines. Place eyes, horizon lines, or movement along those intersections. It creates balance. Tension. Interest. Not dead center—unless you want that sterile, symmetrical vibe.
Leading Lines – Guide the Eye
Roads, fences, hallways, shadows—they all point somewhere. Use them. Direct attention right where you want it. A character walking down a hallway? Let the walls pull the viewer in with them.
Foreground, Midground, Background – Build Depth
Flat footage feels cheap. Add layers. Shoot through a window, tree branch, or doorway. Suddenly, there’s a dimension. There’s a mystery. There’s you, controlling what the audience sees.
Headroom & Looking Space – Don’t Chop Heads (Please)
Too much space above the head? Looks awkward. Too little? Feels cramped. Leave just enough. And if someone’s looking to the right? Give them room in front of their face. Otherwise, it feels like they’re staring into a wall.
Cutaways & B-Roll – Save Your Edit
You don’t have to show everything upfront. Cut to a hand turning a doorknob. A clock ticking. Rain on a window. These tiny moments add rhythm. They hide edits. They breathe.
And here’s a pro move: move the camera with purpose. A slow push-in during an emotional line. A subtle pan to reveal something shocking. Every movement should say something.
Lighting Strategies for Stunning Visuals
Lighting makes a huge difference in your video. Bad lighting looks cheap, while great lighting makes even a $500 setup look expensive. Treat light like your lead actor – it sets the mood and emotion.
Natural Light – Your Free Superpower
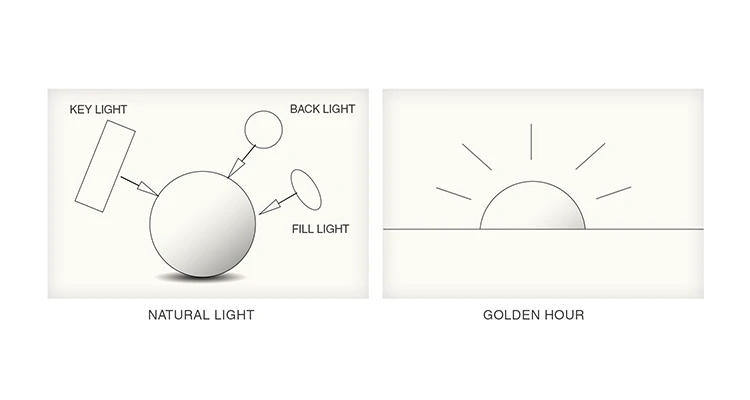
Golden hour—the 30 minutes after sunrise and before sunset—is magic. Warm. Soft. Glowing. Use it. Film faces in open shade during midday. Avoid harsh overhead sun (hello, raccoon eyes). And shoot toward the light for dreamy silhouettes or lens flares—just don’t blow out the highlights.
Three-Point Lighting – The Foundation
This isn’t just for studios. You can DIY it in your living room.
– Key Light: Your main source. Place it at a 45-degree angle from your subject. Softbox or diffused lamp works.
– Fill Light: Opposite side. Softer. Reduces shadows. It can even be a white reflector.
– Back Light (Rim Light): Behind them. Creates separation from the background. Makes hair glow. Adds depth.
Avoid Mixed Color Temperatures
Don’t mix daylight (blue) and indoor bulbs (orange). It looks jarring. Pick one and stick to it—or correct it in post. And here’s a pro tip:
Shoot flat or in a log profile when the lighting is uneven. You’ll thank yourself later when color grading saves the shot.
Remember, light isn’t just about brightness. It’s about contrast. Mood. Drama. A dark corner can hide a secret. A spotlight can reveal the truth. So don’t just turn on a lamp and hope. Shape the light. Control it. Use it.
Capturing Clean Audio: Often Overlooked but Crucial
Bad audio makes videos feel fake and unprofessional. Fix it, and they feel real and trustworthy.
Onboard Mics Lie to You
That tiny mic on your camera or phone? It picks up everything except what you actually want: a clear voice. Wind. Camera handling. Background noise—it all sneaks in. Don’t rely on it.
Get an External Mic. Period.
Start simple. A lavalier (lapel) mic clips to the shirt. Perfect for interviews, talking heads, and tutorials. The Rode Wireless GO II or DJI Mic 2 are affordable, wireless, and sound way better than built-in mics.
Shooting dialogue or run-and-gun scenes? Use a shotgun mic mounted on your camera or boom pole. The Rode VideoMic series is solid. Just remember: it’s directional. Point it at the speaker.
Record in Quiet Spaces
Turn off fans. Silence phones. Close windows. Even a quiet hum becomes loud in post. And if you’re filming outside? Windscreen is non-negotiable. That fluffy “dead cat” cover? Worth every penny.
Monitor Your Audio
Wear headphones while recording. Yes, every time. You’ll catch issues immediately—a loose cable, a muffled voice, a plane flying overhead.
And here’s a pro move: record room tone. Just 30 seconds of silence in the space. Helps editors smooth out background noise later. You can enhance good audio. But you can’t rescue bad audio.
So prioritize sound from the start. Because when someone watches your video and forgets the gear… when they just feel the story? That’s when you know you got it right.
How to Make Videography Dynamic with Movement
Static shots are boring. People scroll past. Use movement with purpose: a slow push-in for impact, a smooth pan for surprise, or a follow shot for immersion. That’s dynamic videography.
Start with the Basics: Tripod Pans & Tilts
Even with a tripod, you can create motion. Lock your camera down. Slowly pan left to right during a landscape shot. Or tilt up from feet to face for dramatic entrances. Use a fluid head tripod—makes motion buttery smooth.
Handheld? Only If You’re Stabilized
Shaky footage screams “amateur.” Unless it’s intentional (like action scenes), avoid it. If you must go handheld, brace yourself. Tuck your elbows. Walk slowly. Or better yet—use stabilization tools.
Gimbals – Your Secret Weapon
A gimbal (like DJI RS 3 Mini or Zhiyun Crane) is a game-changer. It keeps your camera level and steady while you walk, turn, even run. Do a follow shot down a hallway? Feels like a movie. Circle around a speaker at an event? Cinematic gold.
Pro tip: Practice basic moves—dolly in, orbit shot, low-to-high lift—before filming. Muscle memory matters.
Sliders & Dollies – Controlled Motion
Want a smooth side glide or a bold aerial shot? Choose a mini slider or drone to match the movement to the emotion. Fast pace is for energy, slow pace is for intimacy, and stillness is for power.
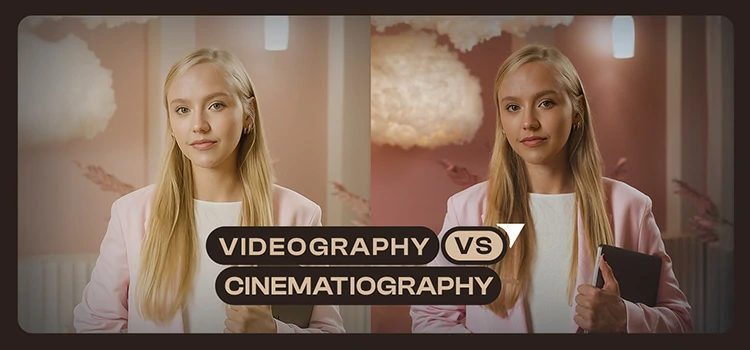
Suggested Article– Videography vs Cinematography.
Planning Your Shoot: Pre-Production Essentials
Best videos are made before filming starts. Pre-production planning makes pro-level work. Without it, you’ll waste time and get a bad final product.
Start With a Clear Idea
Not just “I want to make a travel video.” But: “This is about finding peace in nature through slow mornings in the mountains.” See the difference? One’s vague. The other? Has a soul. A theme. A reason to watch.
Write a Simple Script or Shot List
You don’t need Hollywood dialogue. But know what you’re capturing. Break it down:
– Opening shot (wide landscape)
– Voiceover line 1
– Close-up of hands brewing coffee
– Cutaway of birds flying
Storyboard (Yes, Really)
Grab paper. Or use an app. Sketch rough frames. Stick figures? Perfect. This isn’t an art class. It’s about visualizing flow. How one shot leads to the next. What emotion does each moment carry?
Scout Your Location
Go before shoot day. Check light direction. Noise levels. Power outlets. Is there traffic at 5 PM? Does the sun blast through the window at noon? Find out now—not when you’re setting up.
Gear Check + Batteries + Cards
Charge everything twice. Have spares ready—batteries, cards, cables. Delays kill momentum. Pre-production isn’t flashy, but it’s everything. It keeps you calm. And when the moment hits? You’re not scrambling. You’re shooting.
Editing Like a Pro: Post-Production Workflow
You’ve shot the footage. Now what? It’s rebuilt in post-production, where most people go wrong. They rush, wing it, and add loud music. Great editing is about story flow, rhythm, and emotion, making every second count.
So let’s walk through how pros actually edit—from import to export.
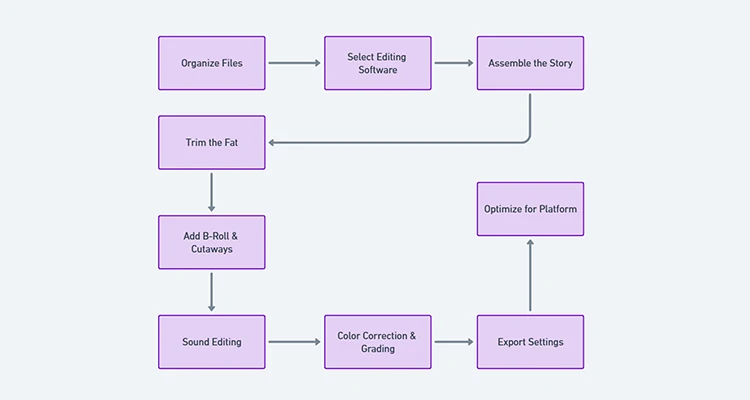
Step 1: Organize Like a Pro
Dumping all your clips into one folder? Stop. Create folders: Audio, B-Roll, Music, Exports.
Label clips clearly: “Interview_Audio_Take2,” “GoldenHour_Beach_Wide.”
Step 2: Pick Your Weapon (Editing Software)
- Free: DaVinci Resolve — yes, it’s free, and it’s insanely Color grading? Top-tier.
- Beginner-friendly: Use Adobe Premiere Rush or Final Cut Pro if you’re on Mac.
- Full control: Choose Adobe Premiere Pro — it’s the industry standard for a reason.
Step 3: Assemble Your Story First
No effects. No music. Just lay down your main clips in order. Voiceover? Put that first. Then cut to visuals that support it. This is your narrative spine. Everything else wraps around it.
Step 4: Trim the Fat
Remove long pauses, “umms,” and shaky B-roll. Be tough. If a shot lacks value or emotion, delete it. Silence can be powerful, but dead air is just dull.
Step 5: Add B-Roll & Cutaways
This is where your video comes alive. Cover awkward cuts. Hide jump cuts. Show detail. A hand turning a page. Steam rising from coffee. B-roll isn’t filler. It’s storytelling texture.
Step 6: Sound Before Visuals
Yes, really. Layer ambient sound. Adjust voice levels. Add subtle music—low, so it doesn’t drown speech. Clean audio makes weak visuals watchable. Bad audio ruins perfect shots.
Step 7: Color Correction → Then Grading
First: fix it. Make skin tones natural. Balance exposure across clips.
Then: style it. Go moody. Warm. Cinematic. Use LUTs (look-up tables) as a starting point—but tweak them.
Step 8: Export Smart
YouTube? Use H.264, 1080p or 4K, bitrate 12–20 Mbps. Instagram Reels? Vertical (9:16), under 90 seconds.
TikTok? Same, but keep the intro fast. First 3 seconds must grab. And always… always do a test export. Watch it on your phone and laptop. Fix what looks off.
Sharing & Promoting Your Videography Work
You did it, but now what? You created a great video, but that’s only half the battle. The other half is getting people to watch it.
First: Optimize Before You Upload
Don’t just drag and drop to YouTube or Instagram. Ask: Where does this video live best?
– YouTube? Long-form, searchable. Use keywords in title, description, tags. “How to shoot cinematic B-roll” beats “My Video #7.”
– Instagram Reels? Fast hook in first 2 seconds. Bold text. Vertical (9:16). Hashtags: #videographytips, #filmmakerlife, #cinematicvideo.
– TikTok? Even faster. First frame must stop thumbs. Use trending audio if it fits. Jump straight into action.
– Vimeo? For portfolio. Clean, minimal. Let the work speak.
Second: Share with Strategy, Not Spam
Don’t dump your link everywhere with “Check this out!” Instead:
– Post the video + a story behind it. “This shot took 37 takes. Here’s why it mattered.” People connect to struggle. To truth.
– Tag gear brands you used (nicely). “Loved filming with my DJI RS 3 Mini – smoothest glide yet.” They might reshare.
– Join filmmaker communities. Facebook groups. Reddit threads. Contribute first—don’t just self-promote.
Third: Build a Home for Your Work
Social media can vanish overnight. Algorithms change. Accounts get banned. So create your own space. A simple website. Your name as the domain. A reel. A bio. A contact page.
Use Squarespace, Wix, or WordPress. No coding needed. This is your proof of skill. Your portfolio. Where clients go when they Google you.
Last Truth: Consistency > Virality
One viral video feels amazing. But it fades. Posting regularly? That builds trust. An audience. A reputation. So share often. Learn from comments. Tweak your next video.
Because promotion isn’t a one-time push. It’s showing up—again and again—until people can’t ignore you. And when they finally say, “Wait, who made this?” That’s when your career starts.
Common Videography Mistakes (and How to Avoid Them)
Everyone makes videography mistakes, even admired filmmakers. They learned from failures and kept going. Here are the top 7 beginner errors and how to avoid them.
1. Thinking “Good Enough” Audio Is Fine
Yeah, the video looks crisp. But if your subject sounds like they’re talking from inside a cardboard box? People tap away. Fast. Built-in mics pick up everything except what matters. Wind. Camera buttons. Distant traffic.
✅ Do this instead: Use a lavalier mic clipped to a shirt for interviews. Or a shotgun mic on a boom or camera for general use. And always, monitor with headphones while recording. Catch issues now, not later.
2. Shooting in Harsh Midday Light
Sun high overhead? That means raccoon eyes, squinting faces, and skies burned out to white. Doesn’t matter how expensive your camera is—this light ruins shots.
✅ Fix it: Film during golden hour (shortly after sunrise or before sunset). Softer. Warmer. More cinematic. No golden hour? Use a reflector or diffuser. Or shoot in open shade. Problem solved.
3. Letting the Camera Shake Like It’s Possessed
Handheld can work. When done right. But shaky, bouncy movement? That’s not “documentary style.” It’s nausea-inducing.
✅ Steady it up: Tripod for static shots. Gimbal (like DJI RS 3 Mini) for walking or tracking shots. Even leaning against a wall or using two hands properly helps. Smooth motion keeps viewers locked in.
4. Showing Up Without a Plan
“Just wing it,” you say. Two hours later, you’re standing in the same spot, missing key angles, and realizing you forgot to film the establishing shot. Panic sets in during editing. You’re stuck with gaps.
✅ Avoid it: Spend 20 minutes planning. Write down 5 must-have shots. Sketch a quick storyboard. Scout the location ahead of time. Know the story beats. Show up ready, not scrambling.
5. Going Crazy with Transitions & Effects
Zooms. Swirls. Glitch edits. Fade-to-black after every sentence. It feels exciting when you add it… Then you watch the full video and cringe. Hard.
✅ Keep it clean: Most great videos rely on simple cuts. Try J-cuts (audio leads the visual) or L-cuts (visual lingers). Save flashy effects for one impactful moment, not every 5 seconds.
6. Framing That Feels “Off”
Chopped-off heads. Too much empty sky. A person shoved into the corner like they don’t belong. Your brain notices something’s wrong, even if you can’t explain why.
✅ Frame with purpose: Turn on grid lines. Use the rule of thirds. Give people space to look into the frame. Leave headroom. Small tweaks make your shots feel intentional, not accidental.
7. Assuming Your Footage Is Safe
You finish shooting. Transfer to your laptop. Maybe back up “later.” Then your drive fails. Or the card corrupts. Poof. All gone. No warning. No second chances.
✅ Protect your work: Follow the 3-2-1 backup rule. Three copies. Two different devices (SD card + external drive). One offsite (Google Drive, Dropbox, or Backblaze). It takes five extra minutes. But it saves months of regret.
To Conclude: Start Making Videography Today
You don’t need permission, the “perfect” camera, crew, or budget to start. You just need to begin. Videography isn’t about gear—it’s about seeing differently. Capturing moments that matter. Telling stories only you can tell.
Yes, you’ll mess up. Shaky shots. Bad audio. Awkward edits. So did everyone else. But every pro started right where you are: clicking record for the first time.
Now’s your moment. Grab your phone or camera. Plan one shot. Light it well. Record clean audio. Edit with purpose. Share it proudly.