Darkroom Photo Manipulation before Photoshop – A Walk into the History

If you were born after Adobe Photoshop Era, you might know how photo retouching is done in Photoshop within short time. But, you will be amazed how older generation used to Photoshop in their Photo Shop before there was Adobe Photoshop. After the invention of the camera, the Photograph Industry skyrocketed and invented many new techniques. And “Photo Manipulation” became a new term for these strategies. But, did you think that it was related to Adobe Photoshop only?
The word “Photo Manipulation” is now-a-days synonymous to “Photoshopping”. But, back in those days, “Photo Manipulation” meant many techniques including film and negative manipulation, darkroom manipulation, chemical manipulation, and more. Even the word “Retouching” you know that is now closely related to Photoshop, was invented even earlier than Photography. It was a common term for Painters, which meant reworking on their Painting to enhance it.
Photo Manipulation in History
Photo Manipulation is anything to do on an image with a view to correcting defects and enhancing it. It started with the invention of the camera and photograph in the early eighteenth century. An early remaining example of manipulation was in the 1860s when an image of Abraham Lincoln’s head was attached to the body of John C. Calhoun.
In that time, the photographers retouched photos in the studio darkroom. They edited photos using traditional tools and technology. In this present era, photo manipulation sounds good, but before computer and software, it required a whole box of tools, a very sharp eye, and an extremely steady hand with the extreme labor.
Techniques and Tools of the Darkroom:

Before Photoshop, there were numerous photo manipulation techniques such as dodging and burning, vibrating while exposing, scratching the negatives, blurring, airbrushing, painting the negatives, coloring, etc. The photographers used photo-montage, or combination printing to manipulate records of historical events or to create painting-like imagery. All these works, they did in the darkroom of the studio spending a lot of time. There was always the chance of errors. That’s why most of the Dark Room Manipulators used to work on a copy of the master negative.
The photographers manipulated negatives using a double-exposure method or by piecing photos or negatives together. They apply bleaching to artfully lighten or totally wash-out parts of the photograph. They also used hand coloring for fine art painting.
The photographers used many tools for image manipulation such as magnifying glass, pastes, ink, cotton, light, cutter, palettes, opaque paints, brushes, eraser, charcoals, scale, etc. Many tools of photoshop have come with the same shape and function of the tools before.
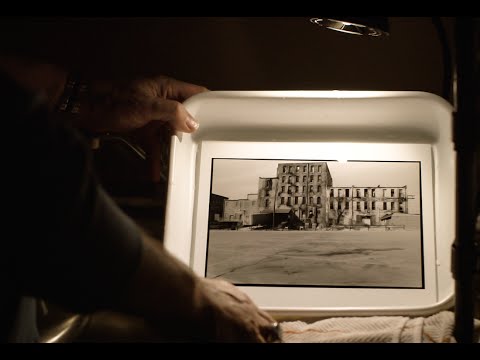
How did the Photographers work in the Darkroom?

Before digital cameras and memory card, the photographer shot photos by the camera with the film. It had a limitation. When they finish a film capturing photos, they had to develop the negative in the traditional darkroom.
Now let’s see how the photographers worked in the traditional photo shop or darkroom step by step.
- The photographers firstly opened the rolled film or negative out of the camera.
- Then, they took out the negative from the rolled box for developing and in this time the negative is completely dark as it was. After developing, the captured images become visible in the negative.
- They cut the beginning and the ending part of the long lace of the negative by scissor.
- They loaded the negative with another big developing wheel and put it into the tank and set the cap. The process they did with the very clean and dry hand.
- Now, they poured water with chemical into the tank and shakes the tank to remove the air bubbles. The temperature of the water should be 60 to 70 degree Celsius. It took six minutes developing time.
- They removed the water out of the tank and filled it again with Stop Bath chemical mixture and shakes in the same way.
- Next, they filled the tank with Fixture, another chemical mixture and shakes. It took generally 5-10 minutes.
- At this stage, the captured images on the negative became visible and it is time to print and wash.
- The photographers took the negative under a projector with a frame. Here, they printed the image with projector-light on a photographic paper in the darkroom.
- Getting the printed paper, they took it in a tray and drowned into water.
- They shook the paper slowly. They made Develop 1 minute, Stop 1 minute and Fixer 1 minute. Then, water rinses at least 5 minutes for washing.
- Finally, they dried the photo and in this way, the photo became ready for use.
Photo Manipulation in the darkroom
Manipulation activities in the darkroom was not as easy as the present photo manipulation in Photoshop. It was laborious and time consuming also. It is almost like a drawing picture from scratch.
Spot Retouching: In the darkroom, the photographers removed spots from photos by analog process, such as-
- At the very first, they took the image and placed it on a table.
- They taped it around the photo to resist the unwanted moving during retouching.
- They used thin brushes as needed.
- Regarding the spot, they choose different inks, water, chemicals, etc.
- They took color with the brush, tried outside the photo to match with the color other parts of the photo.
- When the best match came, they applied the color on the spot and let it dry.
- In this way, they finished the small amount of spot fixing works.
Negative Retouching:
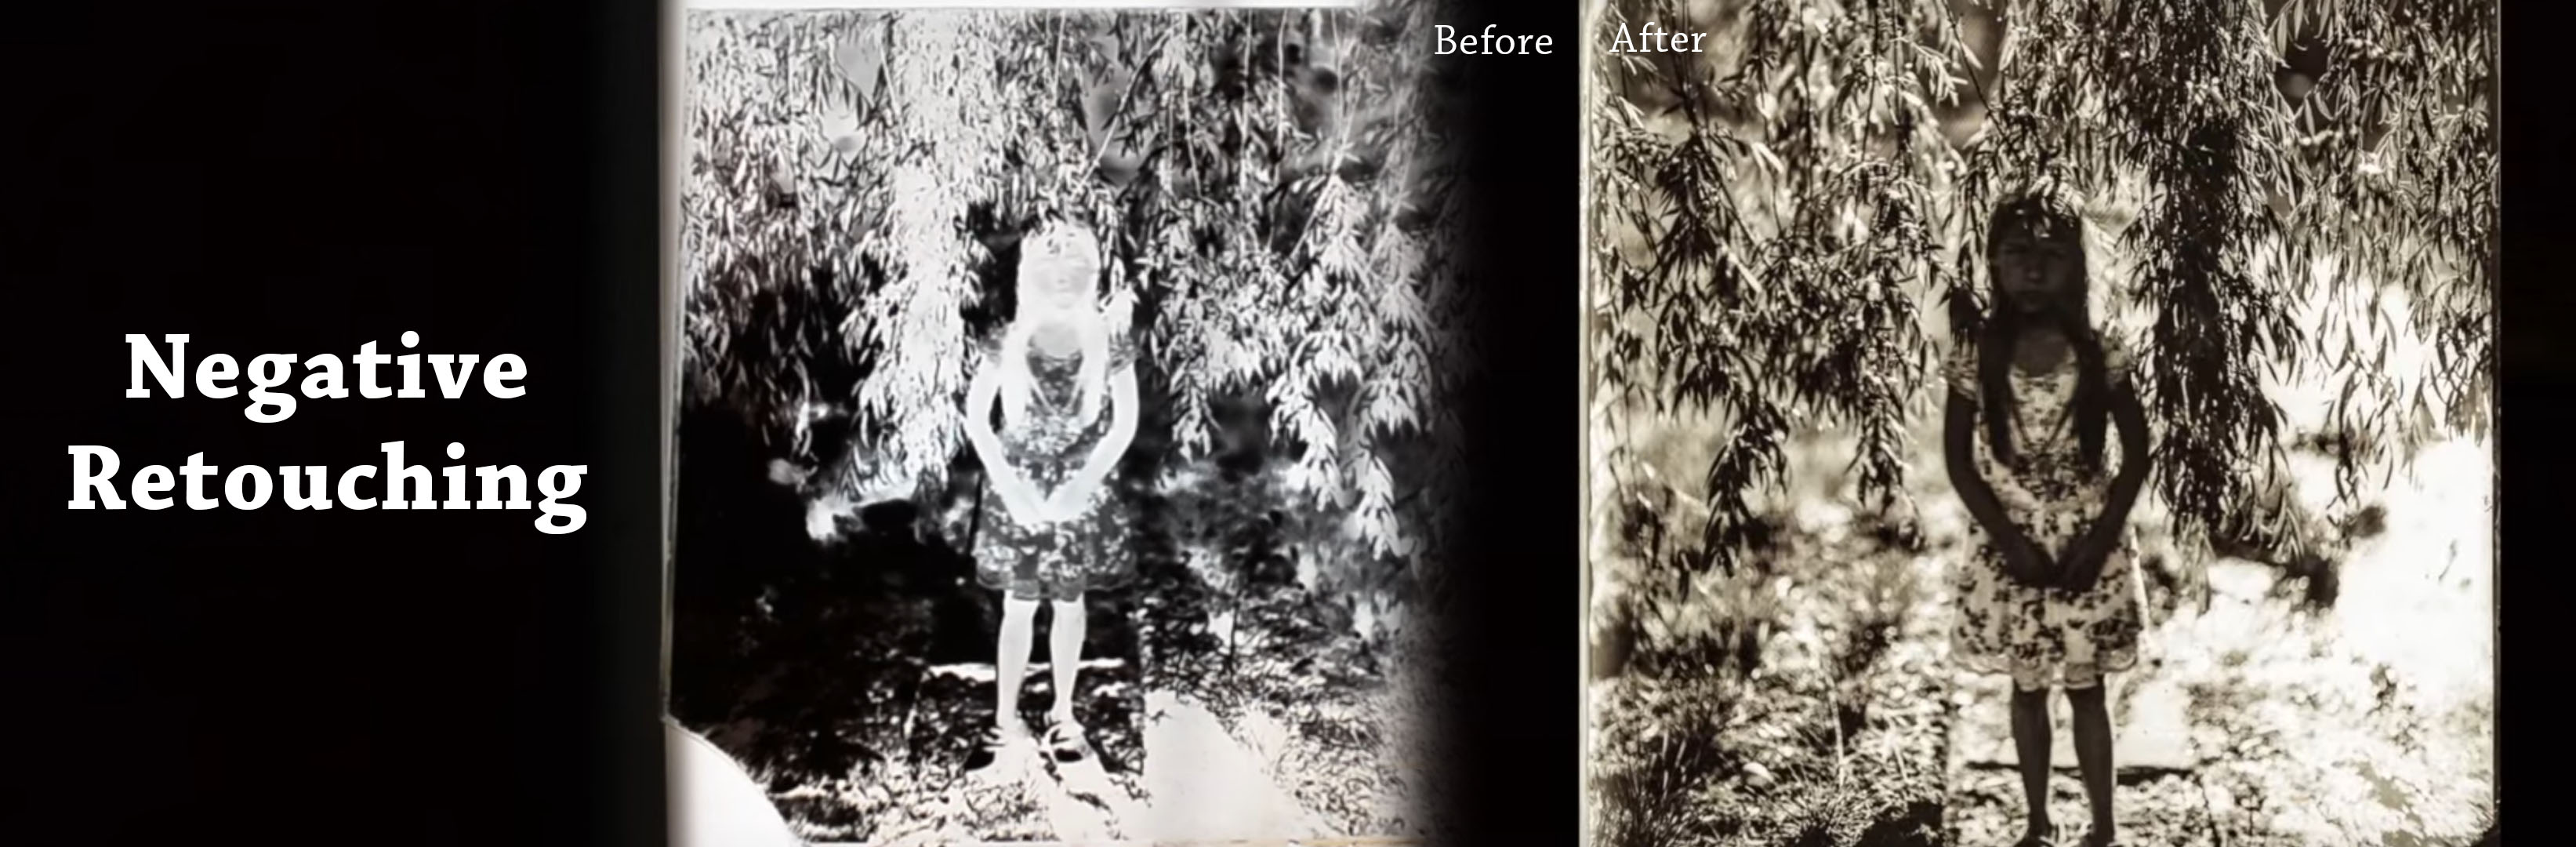
It was (and still is) an important work in the darkroom. The retouchers of the darkroom, used to edit the negative for color correction, lighting, shadowing, etc. Let’s see how a small negative retouching was done for lighting effect on an individual part of a photo.
- Firstly, they took a negative of black & white photo for light retouching on a table and taped it tightly.
- They used sharp pen and magnifying glass.
- Next, they tried to make numerous white dots on the spot where it needs white light by the sharp pen.
- Later, when they developed and washed the negative, they got white light on the darkness of the photo.
History of Photoshop

Photoshop is the most used photo editing software with a wide range of powerful tools. It was made by Thomas Knoll and John Knoll. Later they sold the license and in 1988, Adobe Systems first launched this software.
At first, there was a great laughter to the name ‘photoshop’, but as time goes, its importance has increased. This editing tool has become very popular to the photographers and to the people out of photography. Its usage has become broadened to the various designs, graphic design, image manipulation, and so on. Many industries have grown depending on the software with the advancement of digital photography, ecommerce business, etc.
How did the Photoshop tool’s icon originate?
There is a variety in the appearance of the present photoshop icons. Some icons are looking exactly as you think, but there are some tools, you cannot but laugh looking at their appearance. By the way, let’s know how they have originated.
Crop Tool:

It is a very useful tool used for cutting any individual part of an image. Its appearance is awkward. Its sliding gizmo allowed the photographers to crop and resize any photo maintaining the same aspect ratio. This photoshop tool has originated from this tool:
Brush Tool:

There are various types of brush tool such as Brush tool, History brush tool, Healing brush tool, etc. These tools are widely used for image manipulation, editing or retouching. The brush tools originate from the same as the darkroom brushes. Look over the darkroom brushes:
Dodge and Burn Tool:

These two tools of photoshop have come from the darkroom’s lollipop shaped tools, viz:
In the darkroom, the photographers used these tools to get any area of an image lighter or darker by making the exposure longer or shorter, and even apply the gradient. They didn’t use the tools only for the spots rather to change the whole mood of a photo.
Ethics and Aesthetics of photo manipulation:
Generally ethics is a set of some rules and aesthetics relates nature and beauty.
In photo editing, ethics is a good concern. If editing is excessive and lies about the true message in the picture, then it’ll ruin the purpose of manipulation. You should not edit some images like: politics or politicians, war photos, natural calamities, etc. The visitors want to see the actual photo with the actual news. Any image manipulation in the news media, can also mean yellow journalism. Some magazines like National Geographic, Discovery, etc. uses a little retouching to enhance aesthetics. In these fields, reality matters most.
But, aesthetics and ethics are two different things. It’s all about how true message you are giving. If the manipulation is too much that gives totally wrong message, then this is unethical. But, if not, then there is nothing wrong in being aesthetical.
In Aesthetics, photo manipulation is almost limitless. As long as it looks natural, you can edit. Some sectors that need high level photo editing. These are fashion and model photos, magazines, fine art photography, paintings, etc. The goal of photo editing is to make the photos beautiful and appealing.
Photo manipulation has a long history. Earlier it was laborious and time consuming, but, after the invention of the Photoshop, it has become easier. Photoshop has widened the scope of photo editing. You can have photos in the way as you want and that has made the Photoshop popular.