How To Create a Gradient in Photoshop

Gradients are gradual changes in color or tint over an image or a layer in Photoshop. Gradients can be layered and blended to add subtle changes in color and other interesting effects on images. You will need to use the gradient tool to create a gradient in Photoshop. Gradients can be of different types such as linear, radial, angular, reflected, or diamond gradients. In this tutorial, we are going to create a gradient in photoshop and apply it to an image or a layer.
Step 1: Select the Gradient Tool From the Toolbar
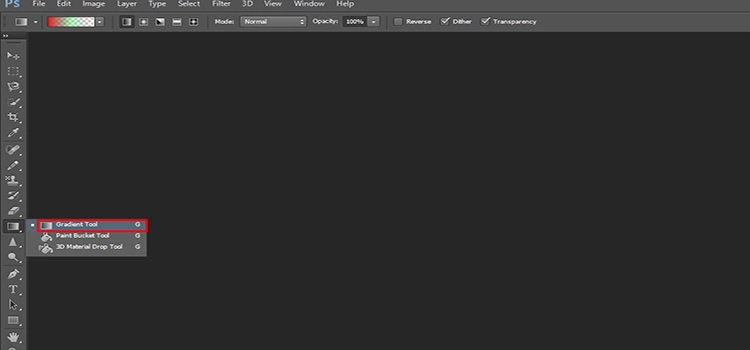
The gradient tool has a square icon with a gray gradient. If you can not see it, right-click and hold on to the icon to expand the menu. Then select the gradient tool from the drop-down menu.
Step 2: Open the Gradient Editor
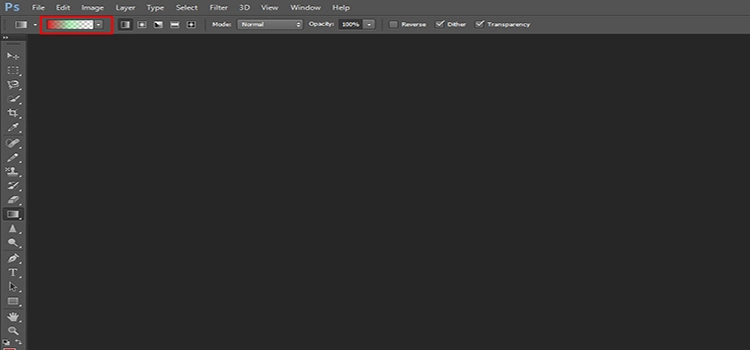
Once the gradient tool is selected, a variety of gradient tools will be opened at the top menubar. Clicking the wide gradient tool at the top will open up the gradient editor.
Step 3: Select a Preset
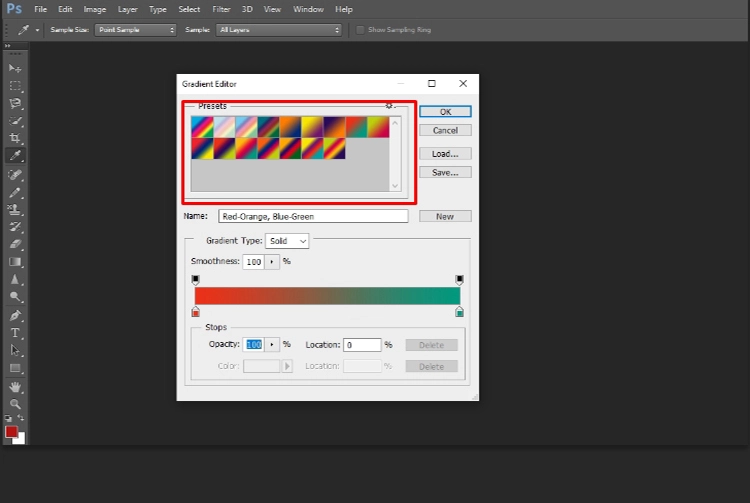
With the gradient editor opened up, a variety of presets will appear arranged by their color and type. It is possible to change any preset as per your wish or use the preset as it is. If you select a preset, the gradient bar below will show a preview.
Step 4: Select and Adjust Colors in the Gradient

In the gradient preview bar, there are squares at the top and bottom. The bottom square sliders are called color stops, whereas the top square sliders are opacity stops. It is possible to adjust the bottom sliders to change where the colors appear and blend in the gradient. You can also select another color by double-clicking on both bottom squares. You will have to select a new color from the color picker. Another square appears in the midpoint where the colors blend together.
Step 5: Adjust the Opacity and Smoothness of the Gradient

As already discussed, the stops at the top are used for adjusting the opacity. That means it controls how hard or transparent the color at a certain area. You can also change the smoothness menu to adjust how smooth the transition is from one color to another color.
Step 6: Save the Gradient

Once you complete creating a gradient of your choice, you will want to save it before it disappears when you move to a different one. To do so, type a name for your gradient into the Name box. Click on the New button to add it to the presets. Finally, click Ok to close the gradient editor. You can now use your gradient to an image or a layer.
Step 7: Apply the Gradient to an Image or a Layer

Now that you have created the gradient, you are now ready to apply it to an image or a layer. To apply the gradient, open a new image on Photoshop. For this tutorial, we have opened a white background image. Now click on the gradient tool from the toolbar. From the top bar, you have options to choose from different types of gradients such as linear, radial, angle, reflected, and diamond. We have selected linear-gradient here. Now click and drag the pointer across the area you want to apply the gradient on. You will see the gradient applied once you release the mouse pointer.
You may also read: How to invert colors in Photoshop?
Conclusion
We have shared the process of how to create a gradient in Photoshop with a few simple steps. We hope that you would be able to apply a simple gradient to a photo or a layer by following these steps. But we encourage you to explore more to learn more advanced gradients.


